An Outlander Claire’s jacket tutorial for you! In season one from Starz’ Outlander, Claire mostly wears these warm wool blend jackets above a tartan skirt that look so Outlandish, I had to make one myself. I hope you’ll be inspired by my own process.
Still I can’t seem to keep my tutorials short and to the point – Oops
I loved doing this project, it was very insightful. If you’ve seen Part 1 of my Outlander costume, you’ll know that the traditional great kilt / Arisaid was actually really easy to make. Pleating was basically all you had to do. Of course my Arisaid is not true to Outlander, because they wear nicely tailored petticoats in the show. But I thought pleating a Scottish Arisaid would get me a bit more into that traditional and historical part of Scotland and its practicality in clothing. I just really wanted to learn how to pleat a great kilt (and it is also so much easier!).
These photos show on which design I have based my Claire inspired bodice: 1, 2, 3.
The finished costume

Click here to fast forward to the actual sewing how-to.
History
My research into the world of Outlander has been such an inspirational and awesome journey. To learn how the costuming team from the show has brought history to the screen was so interesting to discover. I’ve also collected a lot of pictures and inspirations from the web to get enough guidance for my own design. Not only did I delve into Claire’s designs from the show (my most favourite designs, not in order: 1, 2, 3 and 4), I also looked into Scotland’s history and Scotland’s clan society from the eighteenth century. There is so much to discover in Scotland’s history and the show does seem to captivate that Scotland. I also looked into the eighteenth century fashion concerning the famous robe à française and robe à l’anglaise. Also the layering for an eighteenth century costume had a lot to do with my own layering to achieve the right look. In total, research took me a few months. If you want to look back into it and if you are interested in all fashion and history Outlandish, visit my Pinterest board devoted to my Suaip Culaidh project.
The pattern
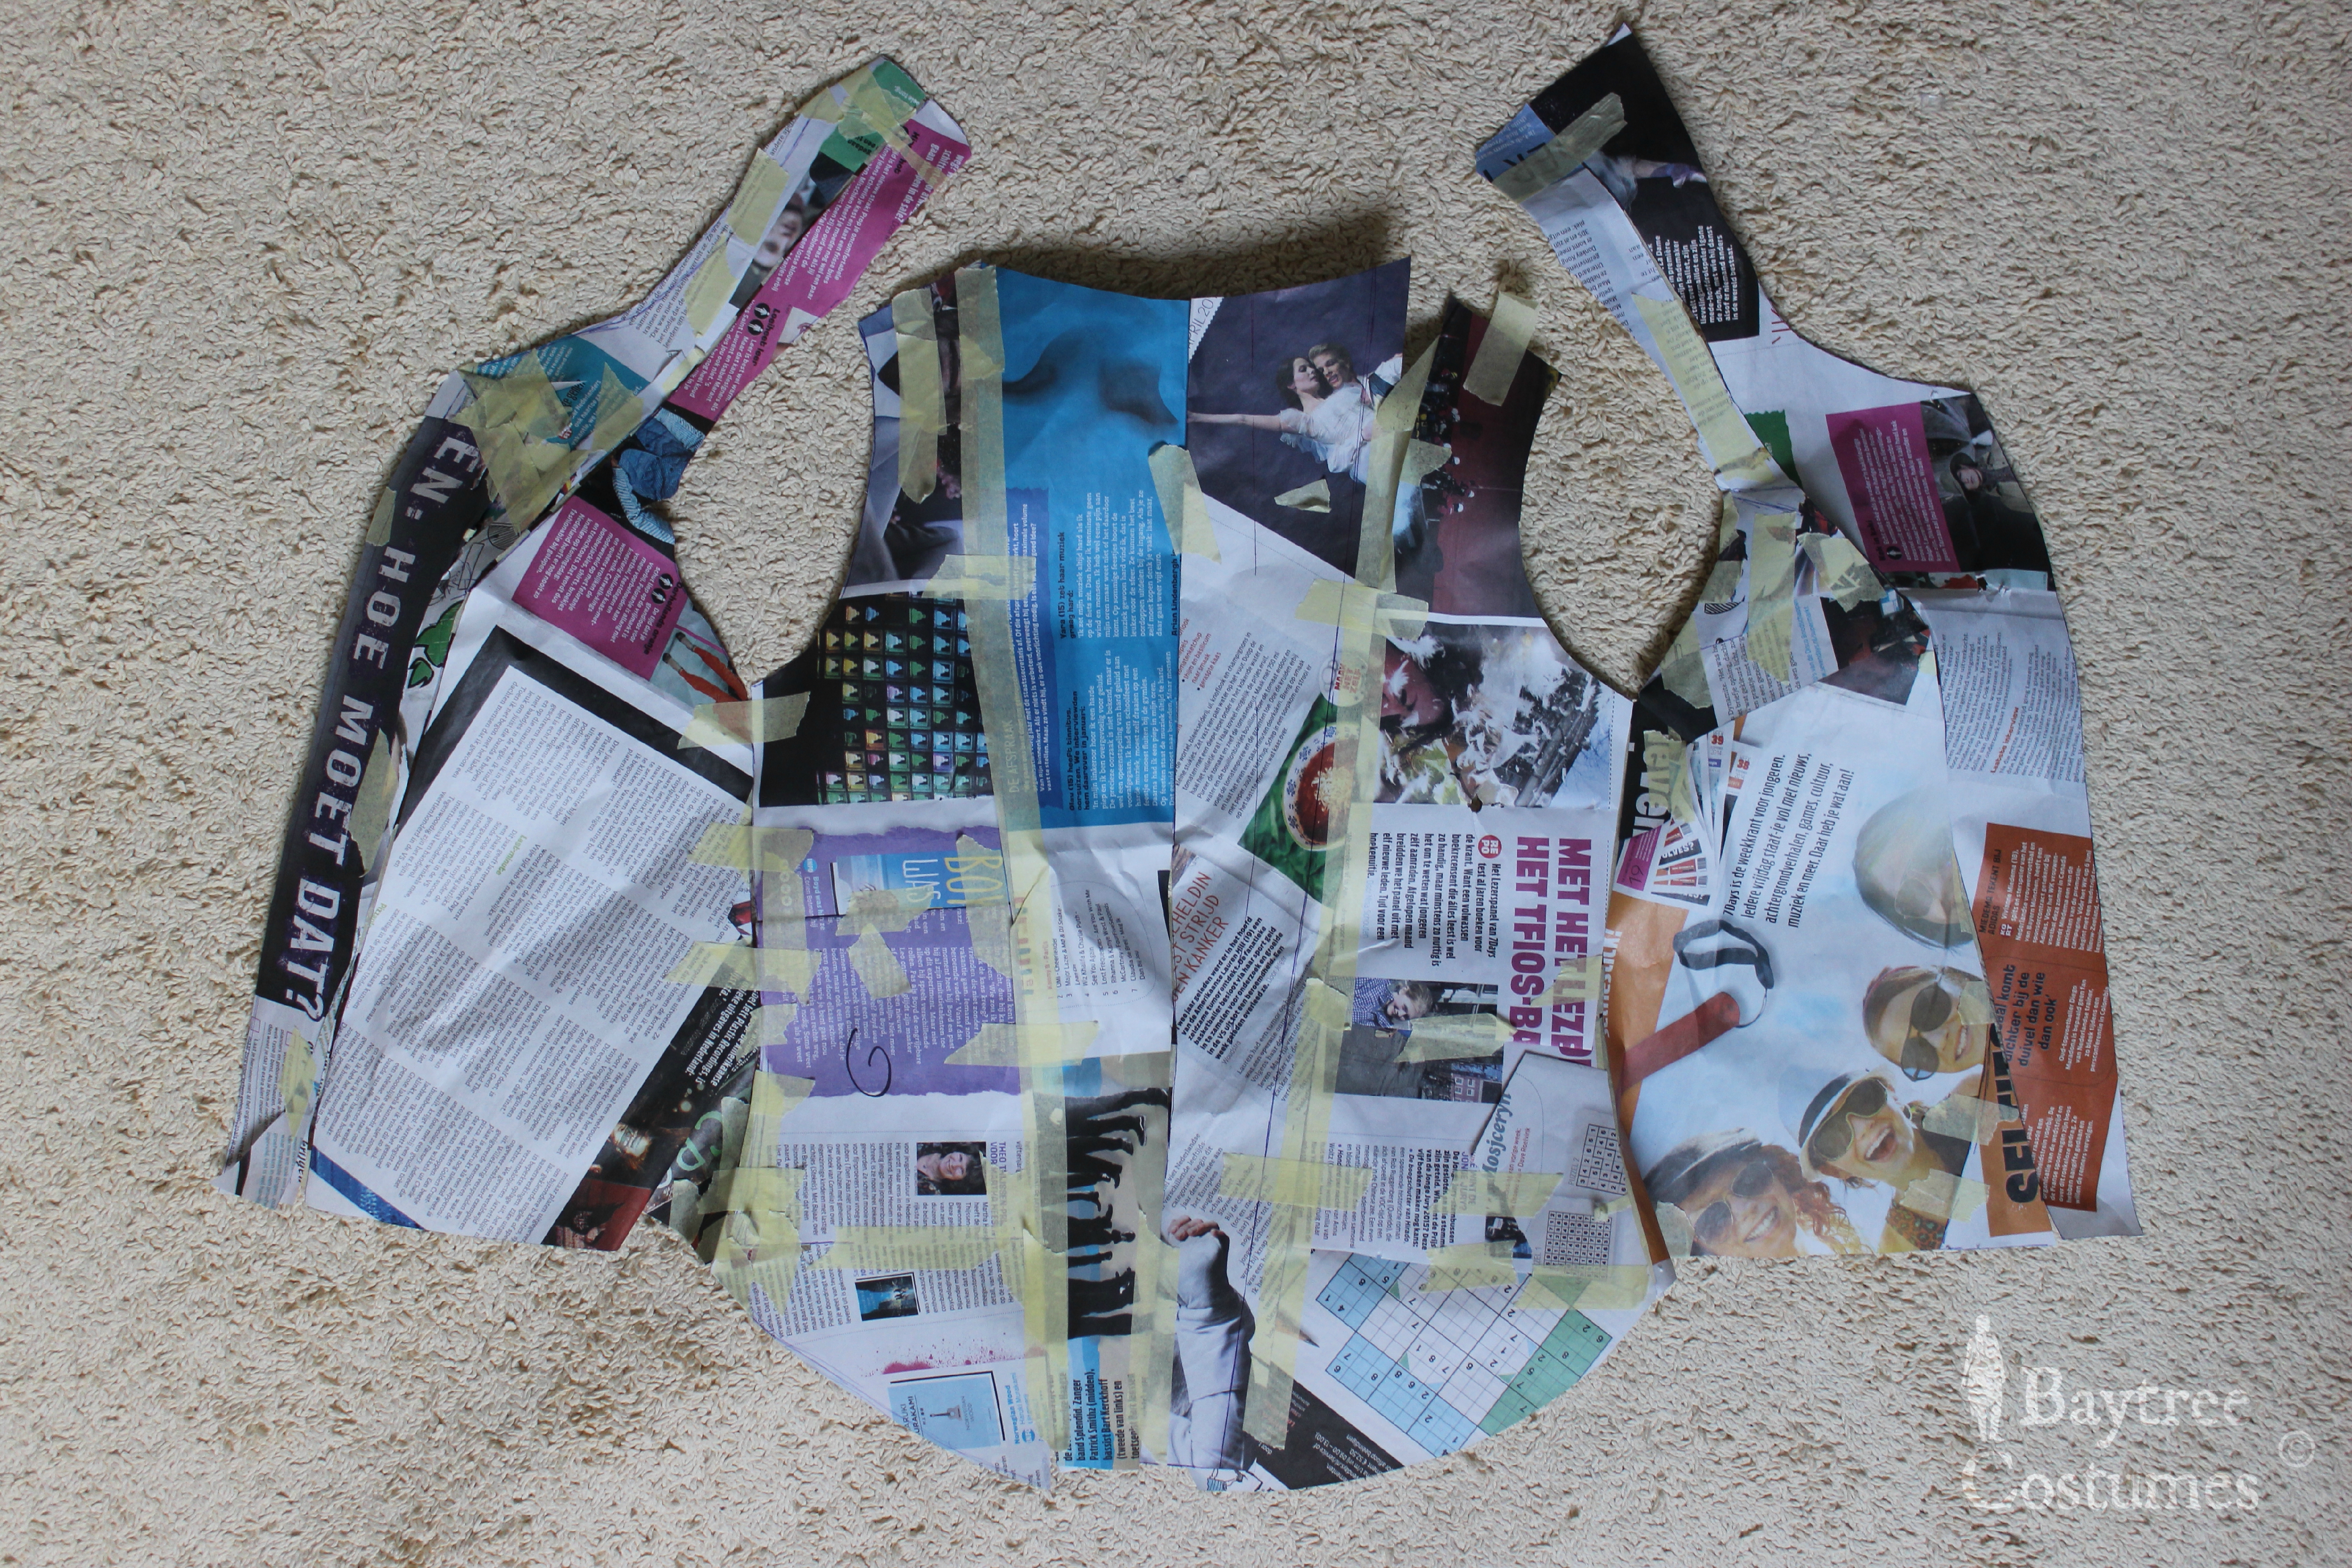
After gathering loads and loads of pictures of different views of the bodice, I finally got an idea of how to put it together. The finished product is not that hard to make, only my trial-and-error process took me forever since I had no pre-pattern and I had to make it from scratch. I improvised on a piece of newspaper and from there I created the final pattern.
The hardest part were the princess seams on the front that run up to the shoulders and stop at the shoulder seam. Since I had never made something as to a great scale this project was, I was constantly puzzling with those seams. In the end it didn’t work out for me on my own, so I went through youtube and found this life-saving video:
It basically explains how you can create your own princess seam for that female gallant and comfortable fit. I just cut the arrow as demonstrated in the video, without any idea how big the arrow had to be, and it came out just right. Everything then fell together like a puzzle and after much stress, sweat and tears it worked out!

Warning: the patterns were a bit too long. The curve I created at the side didn’t come to its full right.
The left two pieces form the princess line. The piece on the second right is the left and right back piece enclosed by two of the pieces on the right. You have to cut out every shape twice.
My alterations: I’ve left out one of the back pieces from the pattern (on the photo right). Claire has three vertical pattern pieces on the back that form a better back pleat than mine. My jacket is also much longer than Claire’s is. What I kept the same: I tried to keep all the seams and finishes the same, so those had my close attention.
The back pleats
Beside the difficulty of composing the pattern (for me alas), the difficulty of the bodices’ back pleats were quite another matter. In some of these pictures: 1, 2, 3 you can see that Claire’s bodice has some Victorian-like back pleats. I was searching all over the internet for a tutorial, and found one after literally desperate ages (getting a bit emotional there 😉 ). Sadly it was kind of incomprehensible for my brain and the explanation left me in sewing-twilight. I decided to come up with something myself. I did use some of the tips from the article, but some English terms can get quite ahead of me brain sometimes (Dutch-y problems).

Figuring out the pleats..
Final verdict: secretly still searching for a good outcome, but for now I just declare the back pleats finished. If I make any update, I’ll sure update this paragraph. Or please help me out in the comments on how to achieve Claire’s back pleats!
Necessities
What do you need to make Claire’s jacket / bodice?
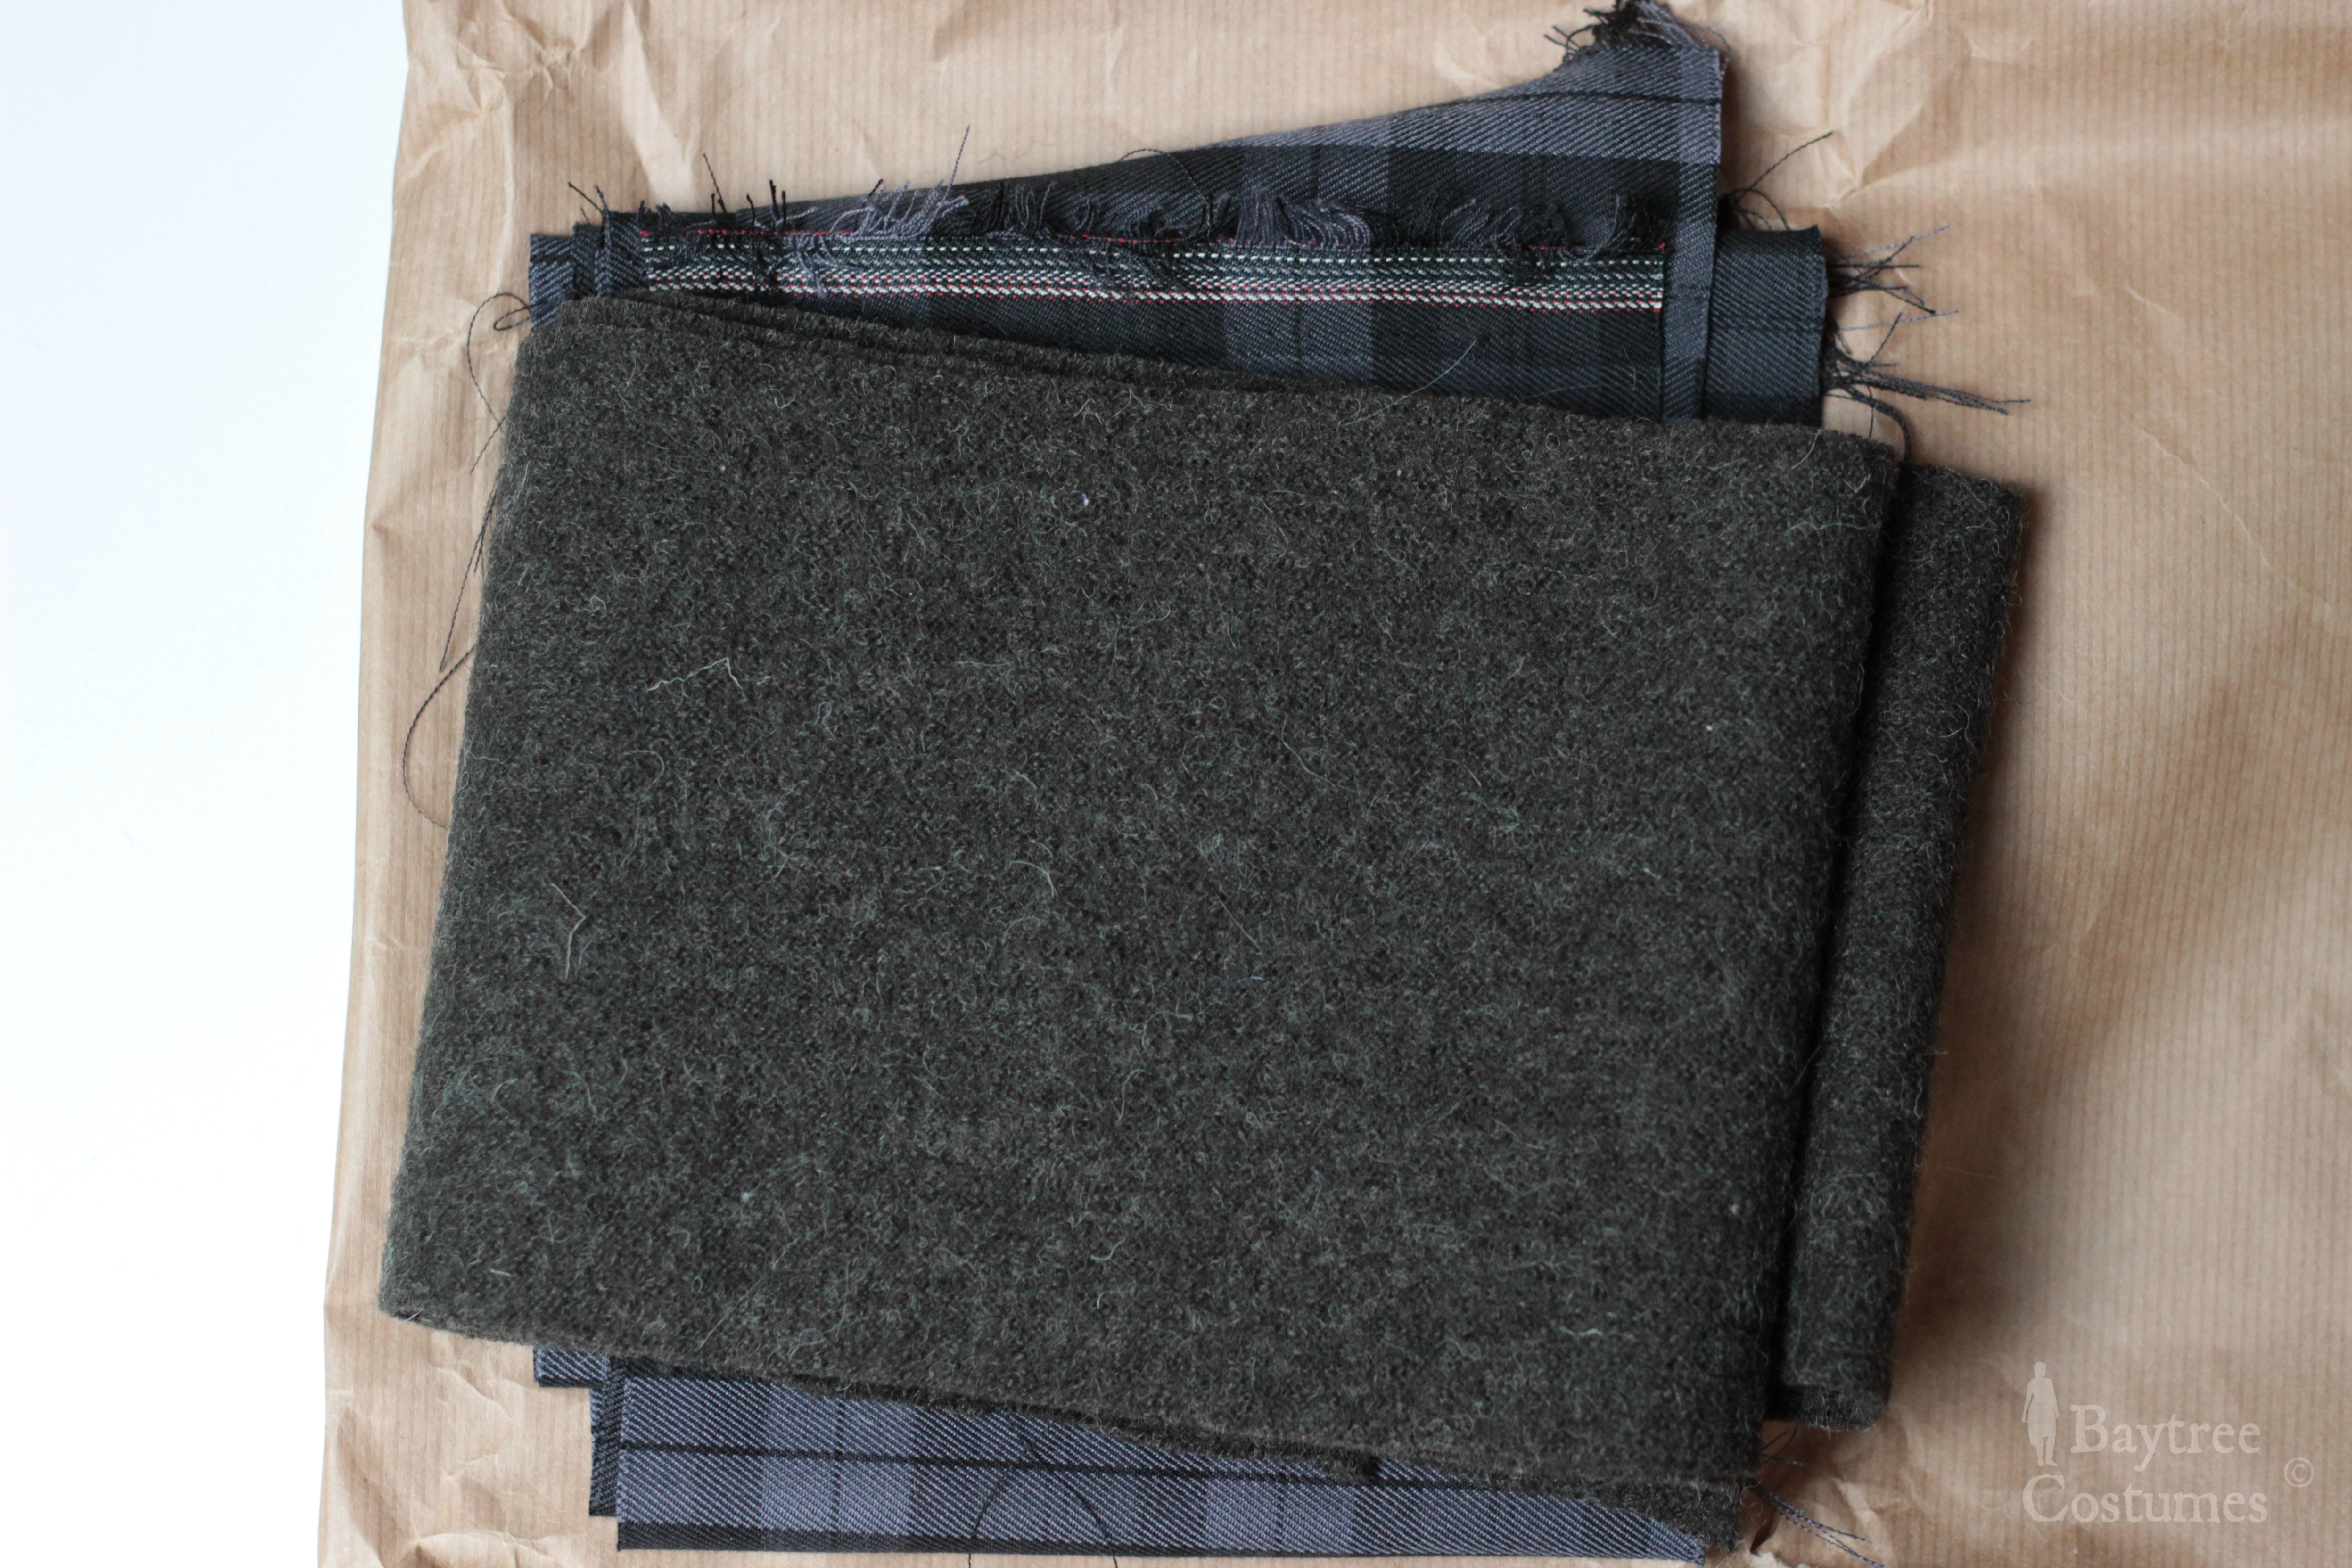
For a fabric I used this amazing rough cooked woollen dark green fabric that has just so much texture to it. It could be a bit irritating for someone with a sensitive skin, just so you can imagine what the fabric feels like, but luckily I don’t have that problem.
I chose this fabric because, and if you have read some of my articles you’ll know my statement, a costume has to have character or it will not speak. Definitely when you make a costume or cosplay a costume from an existing piece, you should add extra texture to make it believable in real life. So remember: texture on the screen is “real”, if you want the same effect in real life: double the texture intensity. Flat fabrics mostly come out unreal and unworn: non-characteristic.
Why did I choose this colour? I chose this dark green colour because of two reasons. Firstly, because 18th century colours were usually, and foremost in less rich societies, dull in colour. Consider that they mostly could only dye their fabrics with natural ingredients. I then had some greens, browns and other similar shades to choose from. I, as always when choosing a key colour, photoshop myself with the bodice and “fill” it with some candidate fabrics to decide which will suit me best. In the end, Claire wore the brown fabric better than I probably would. So that is why.
How much fabric? The best thing is, because wool is not that cheap, that you won’t need that much fabric for this project. I actually used 60 cm (23,6 inches) x 150 cm (60 inches) wide fabric, which just fit. That’s all!
Other necessities which will explain themselves later: 16 small black eyes / hooks, chord to lace the front (I used shoelace which I might change later), a few zip ties (I used three), some masking tape and of course your fabric, matching thread, your pattern, a needle, sewing machine, scissors (normal and fabric), etc. (your other sewing gear).
Some last important notes and WARNINGS
Before we move on to the big stuffs, I’d like to point out some key points that I stumbled on whilst working on this project.
I finished the lower seams and much of the other ones by hand to keep it all invisible. Yes, that sounds quite energy absorbing and it is, but if you sit outside in the sun under the singing birds, time will definitely fly. I felt like creating my own stitch for this project which I’ll break down for you:
How I handstitched
I went through a process of finding the right stitch for this thicker fabric since a blind stitch would still create “holes”. The thicker fabric did make it available to continue the stitch staying on the wrong side of the fabric. You stitch on the surface on the wrong side so that everything is connected as normal. You never make it to the right side of the fabric. Does that make sense?
Claire wears a lot of bodices with DETACHABLE SLEEVES. I immediately wanted to try that out. You should however wear a shift under it, or it will look funny.. I went to a convention and believe me, I know ;). The sleeves went everywhere! My shift project for this costume will come soon!
In my pictures, the bodice is quite long in the back. I have extended the LENGTH because I thought it looked beautiful and more feminine. That’s the great thing about sewing yourself 😉.
Sewing how-to
How to make an Outlander Claire costume tutorial! For your Outlander Claire cosplay.
Note: Normally I give my sewing how-to as detailed as possible for everyone to understand (including myself cause I don’t know all the terms 😉 ), but for this project that is quite impossible – sadly. I’ll be looking all over the internet to get my sewing terms right so please tell me if I have explained anything incorrectly or if you’d like to correct a statement.
All the steps:
- Pattern. Step 1: Pin your patterns to the fabric and cut them out with seam allowance. Don’t forget to fold the fabric so that you cut out every piece twice.


- Step 2: Roughly pin this lot together and stitch it roughly to keep it together safely.

- Seaming & Princess seam. Step 3: Most of the parts you can easily stitch and seam together by machine, but with the princess seam you have got to keep an eye out. There are some videos on how to sew a princess seam neatly, and what I learned from those is that you should pin it together first and ease the fabric as you go along. You’ll do the same at the curve, just pull your fabric there towards eachother. Then you’ll sew along the straight line taking out the pins one by one. This way the curve will be just perfect. Need more help? Watch this video.

Princess seam that reaches to the shoulders
- Finishing seams. Step 4: You can already finish the arm holes (I did a machine top stitch) and you can finish the top of the back (preferably hand stitch – *cough* hypocrite). The front however requires a little more attention so don’t touch until the next step!
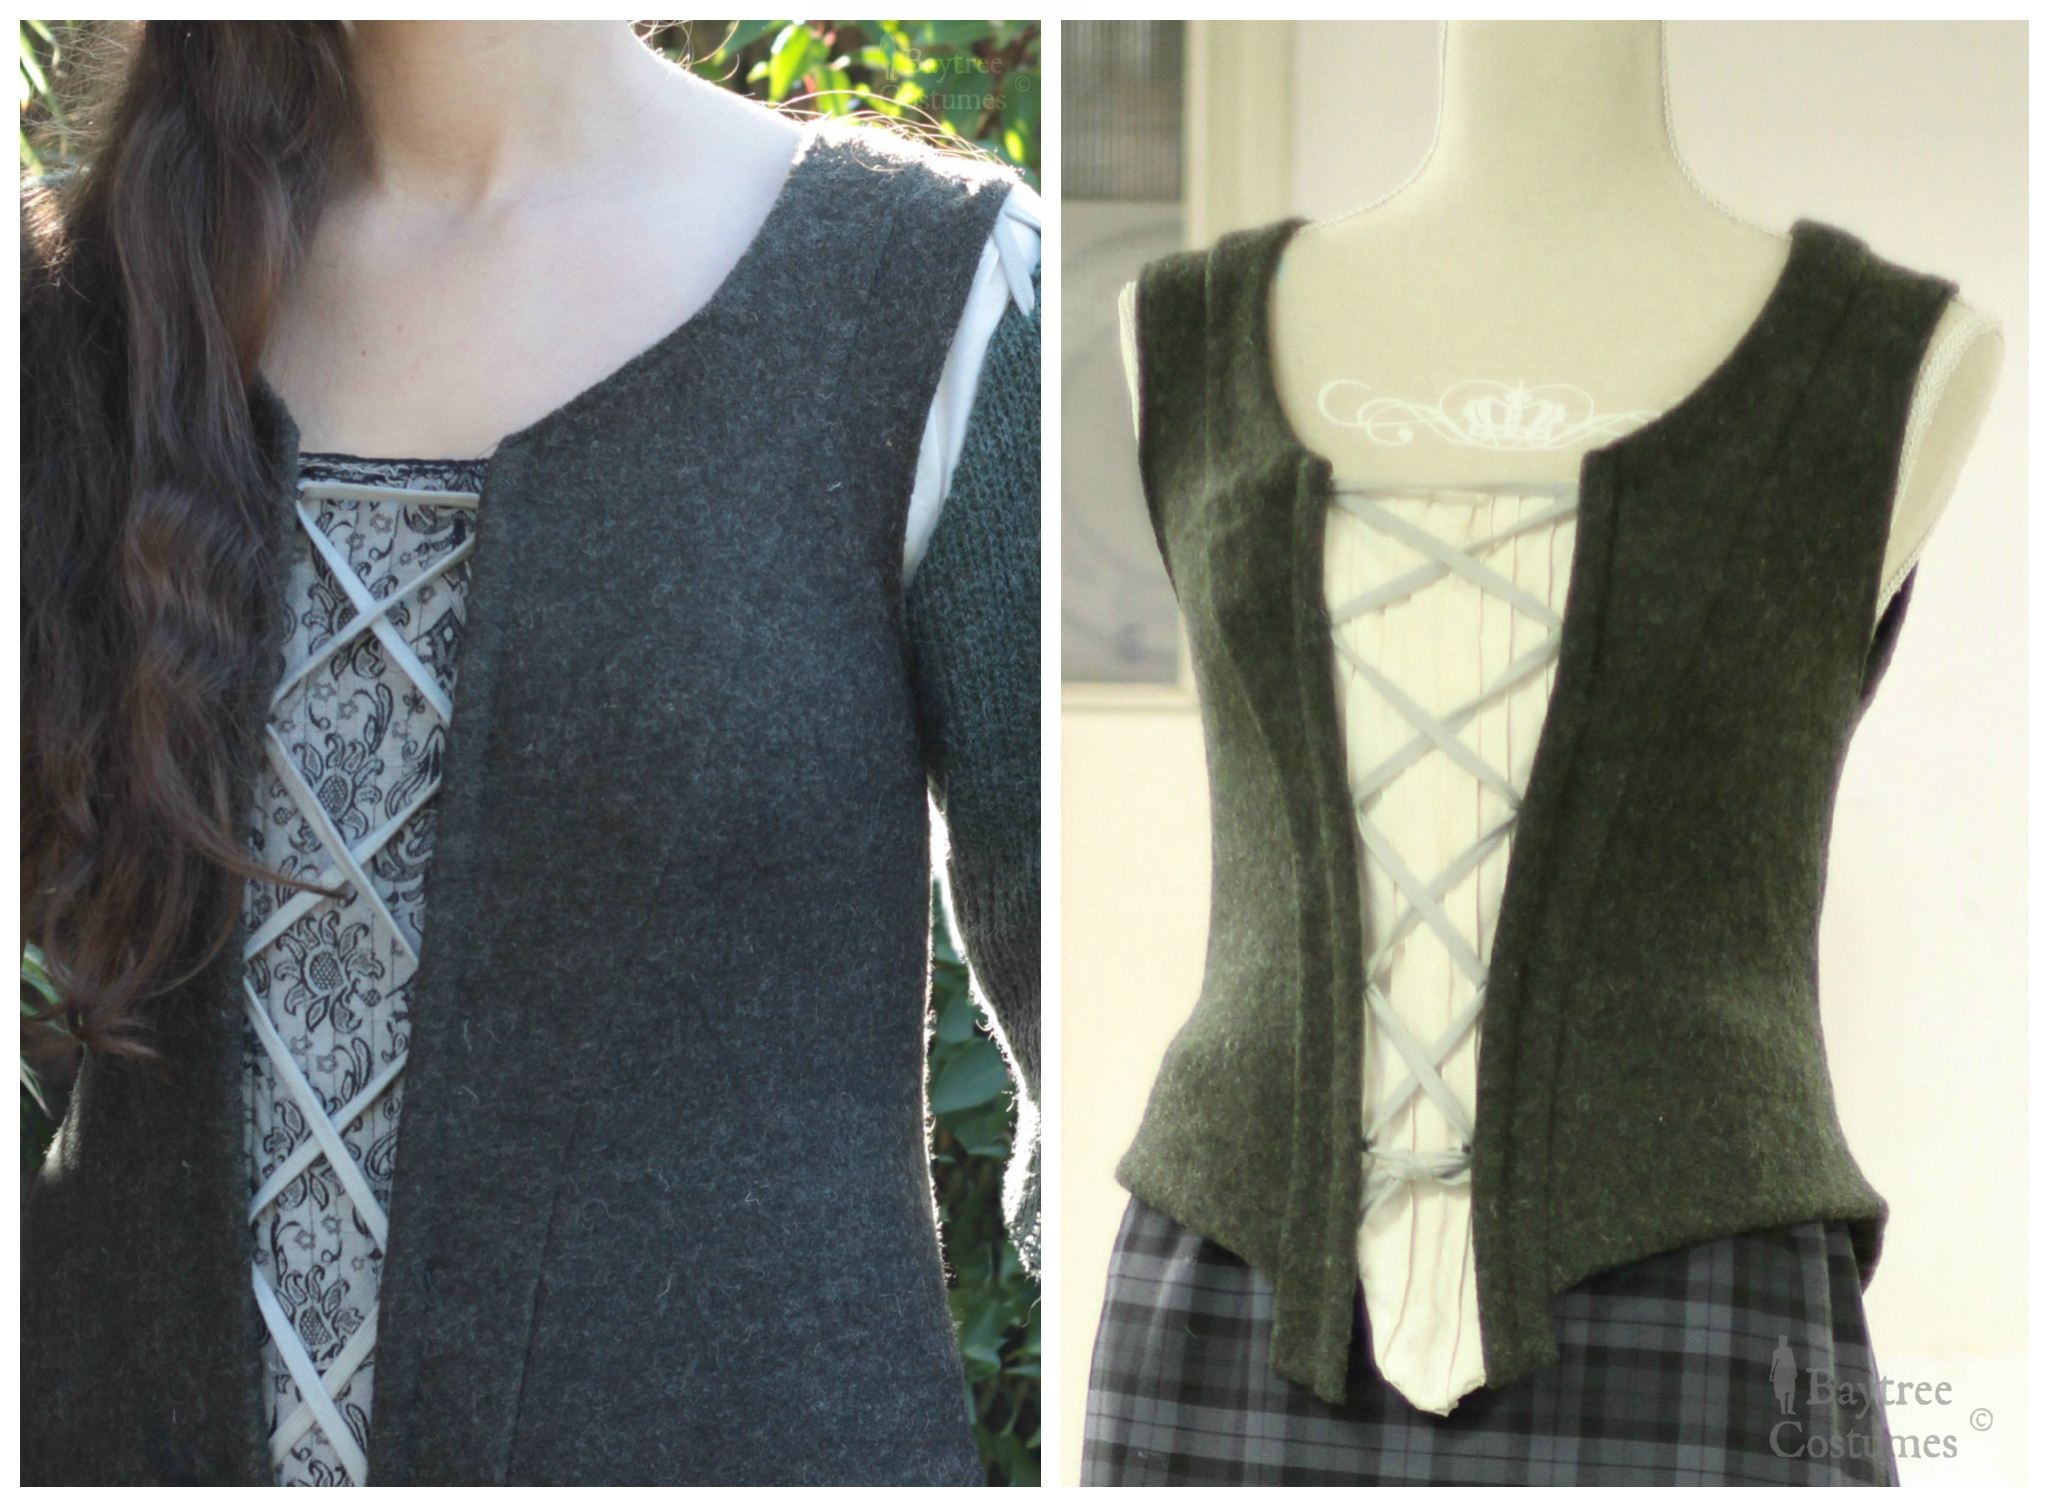
- Making the front. Step 6: Now, the front requires some fitting to get it custom and right. Study these 1, 2 photos for how Claire’s jacket opening is positioned. Firstly I made it way too small as you can see in this picture, and we don’t want that to happen. After a lot of pending and reconsidering, I got it right in the end. I studied a lot of the pictures and it struck me that the front (of course, you dummy) has reinforcement to keep it straight. I have learned this trick from my semi-corset project and I used zip ties and a channel on each side to reinforce the opening to prepare it for the lace up.
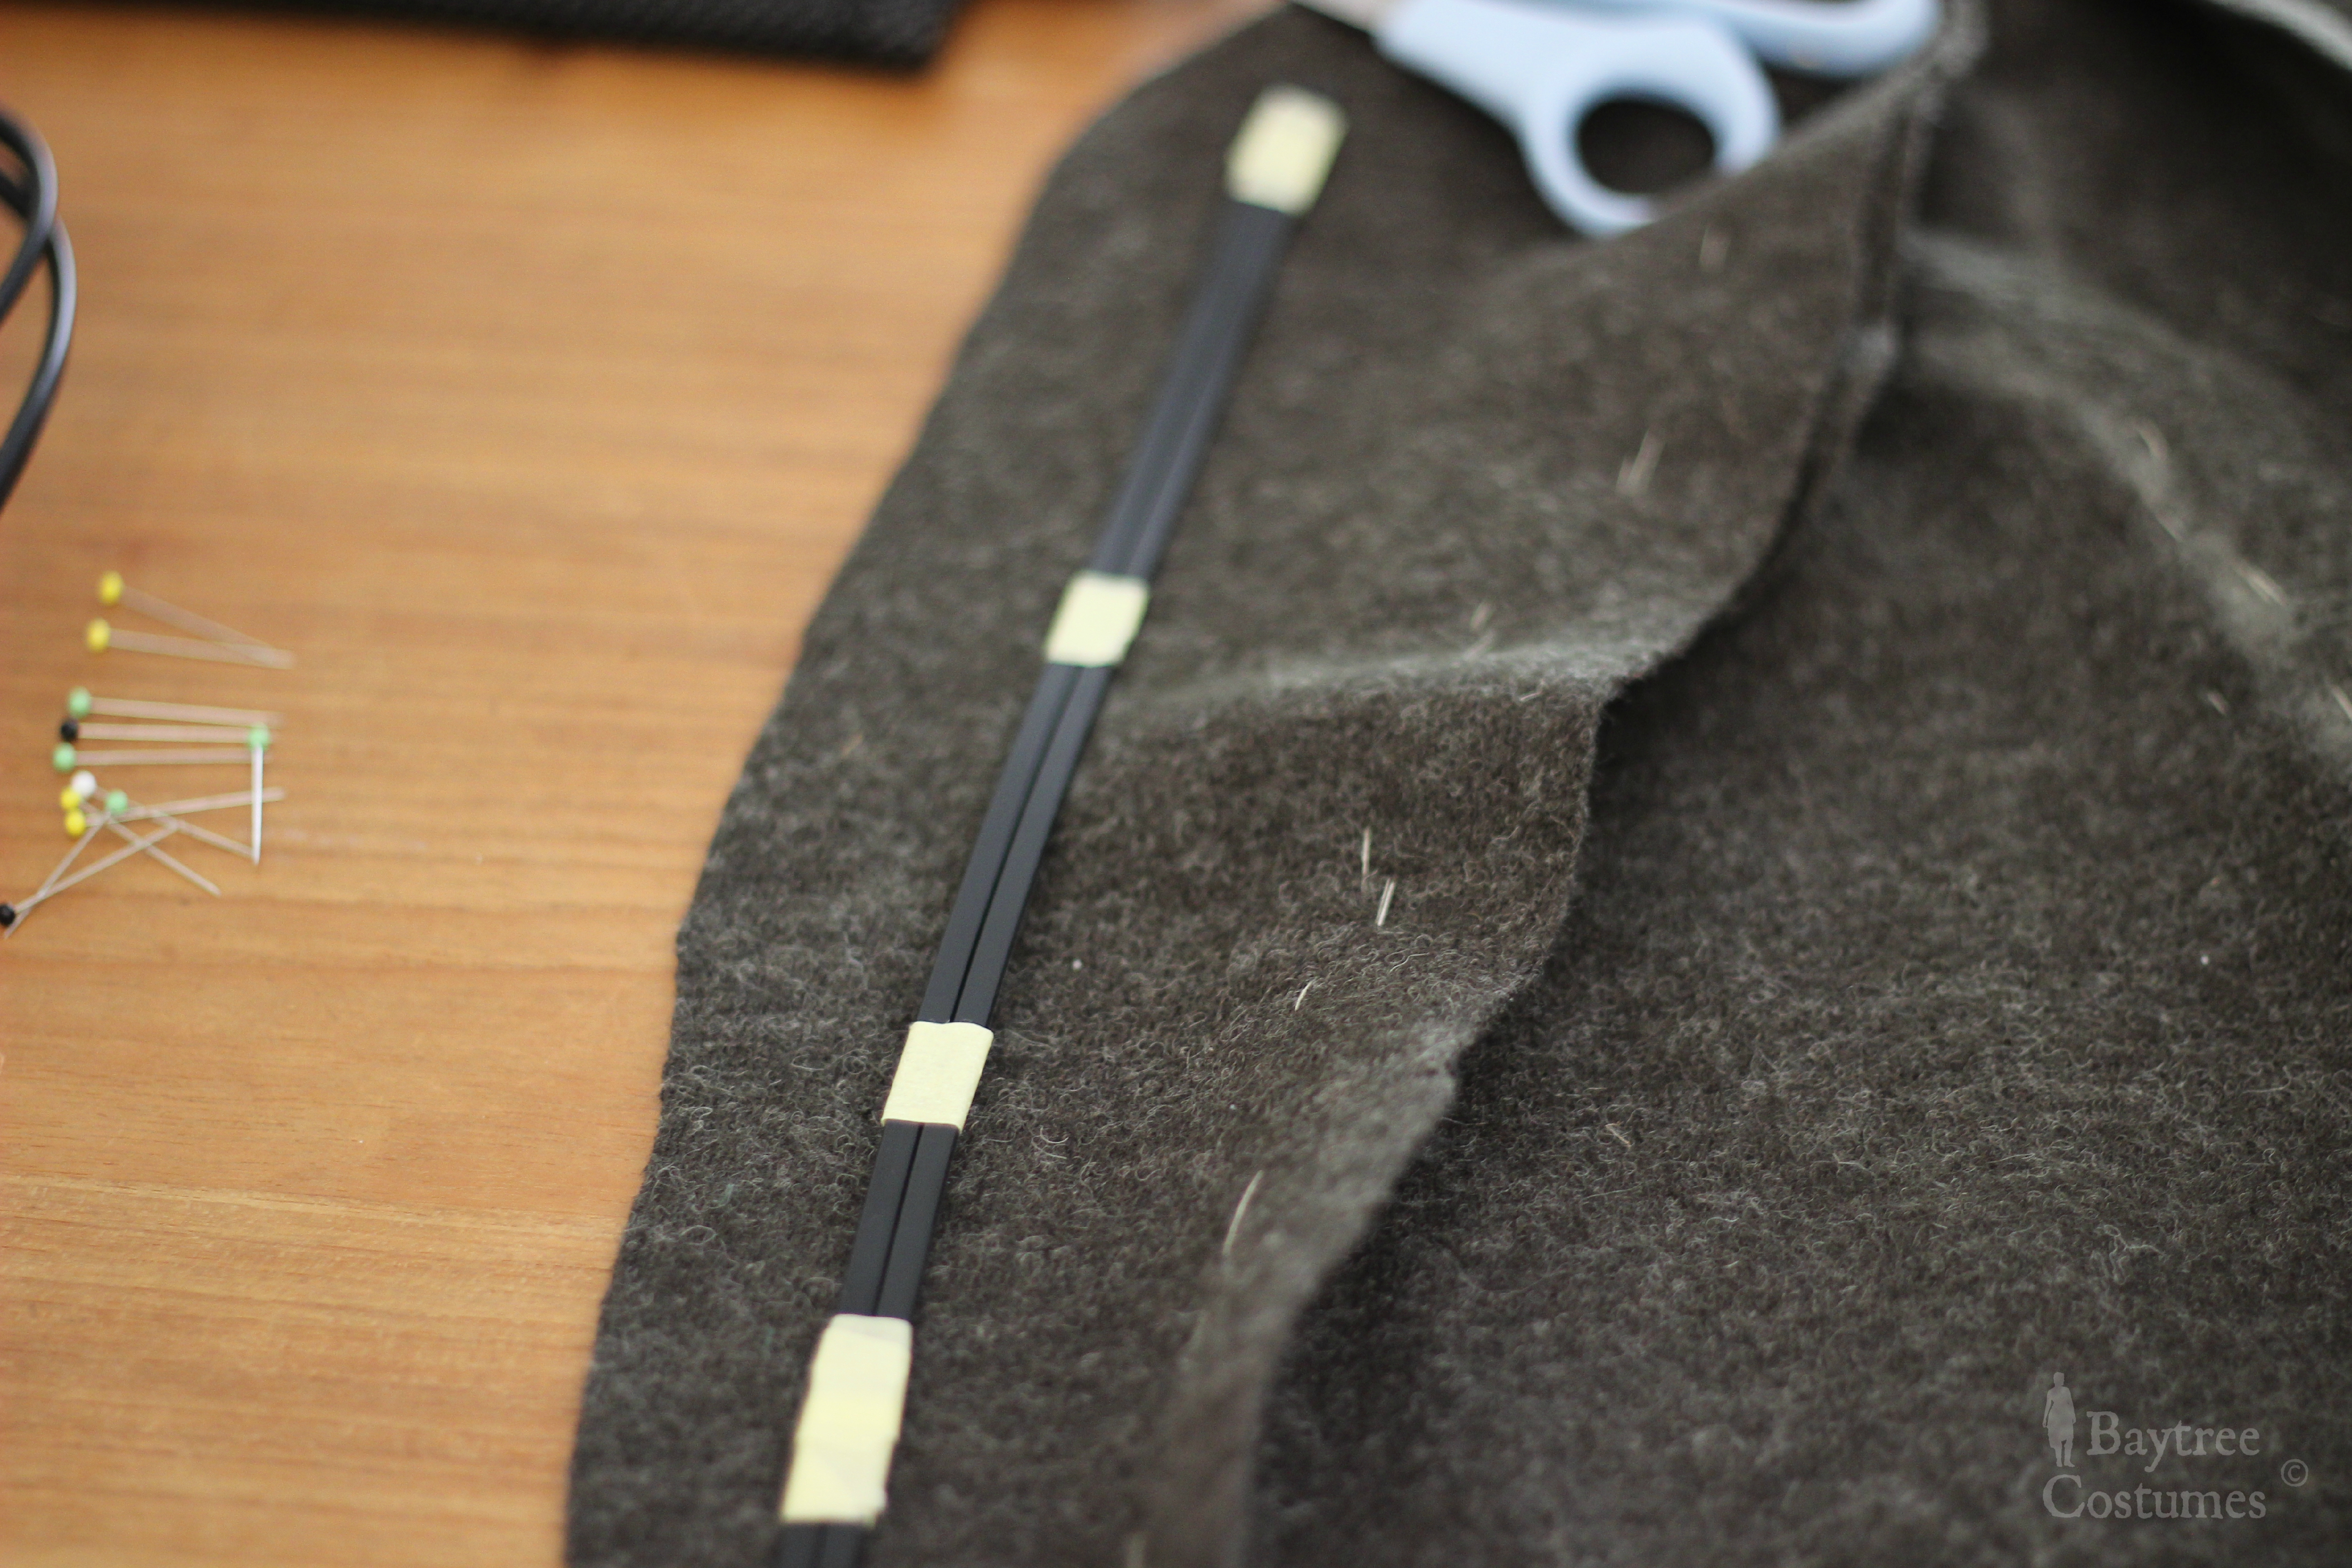
Get your zip ties (I used 2 and two halves), make sure they have the right length and use the masking tape and scissors to get a good strong bone. Sew a channel (for me the zip ties are 1 cm wide and with 0,5 cm allowance on each side that gives 2 cm wide channels) along the side from top to bottom with a machine top stitch and insert the bone. Close the channels and fit! I had to try this out twice and the process of unthreading the channels is just great.. Yeah..
Before and after alteration of the front
- Finishing the front. Step 7: You can zigzag the leftover fabric from the channels on the back and cut it shorter to finish it. The neck is something different. Decide how you want the bending to be. Zigzag the edges and surface hand stitch it as I suggested. You’ll then get a nice smooth fold.
- Closer look at the back and bottom. Step 8: I have left the back quite long as I said before, just to give the design a gentle touch. The bottom is totally hand stitched to keep the curve smooth and nice. I think the bottom line is one of the parts I am most proud of. The two little back pleats are very modestly present, which are only held together by a few hand stitches. It falls nicely by itself – I don’t even really know how I did it. When I do, I’ll tell you! The curving of the hand stitched parts were all eyeballed and made with a little instinct. I’d recommend you to just pin and try!
- Finishing the lot. Step 9: You can now finish all the seams nicely and true to the 18th century (which means good old handwork, surface stitching and some machine zigzagging) and feel good about your project turning out awesome!
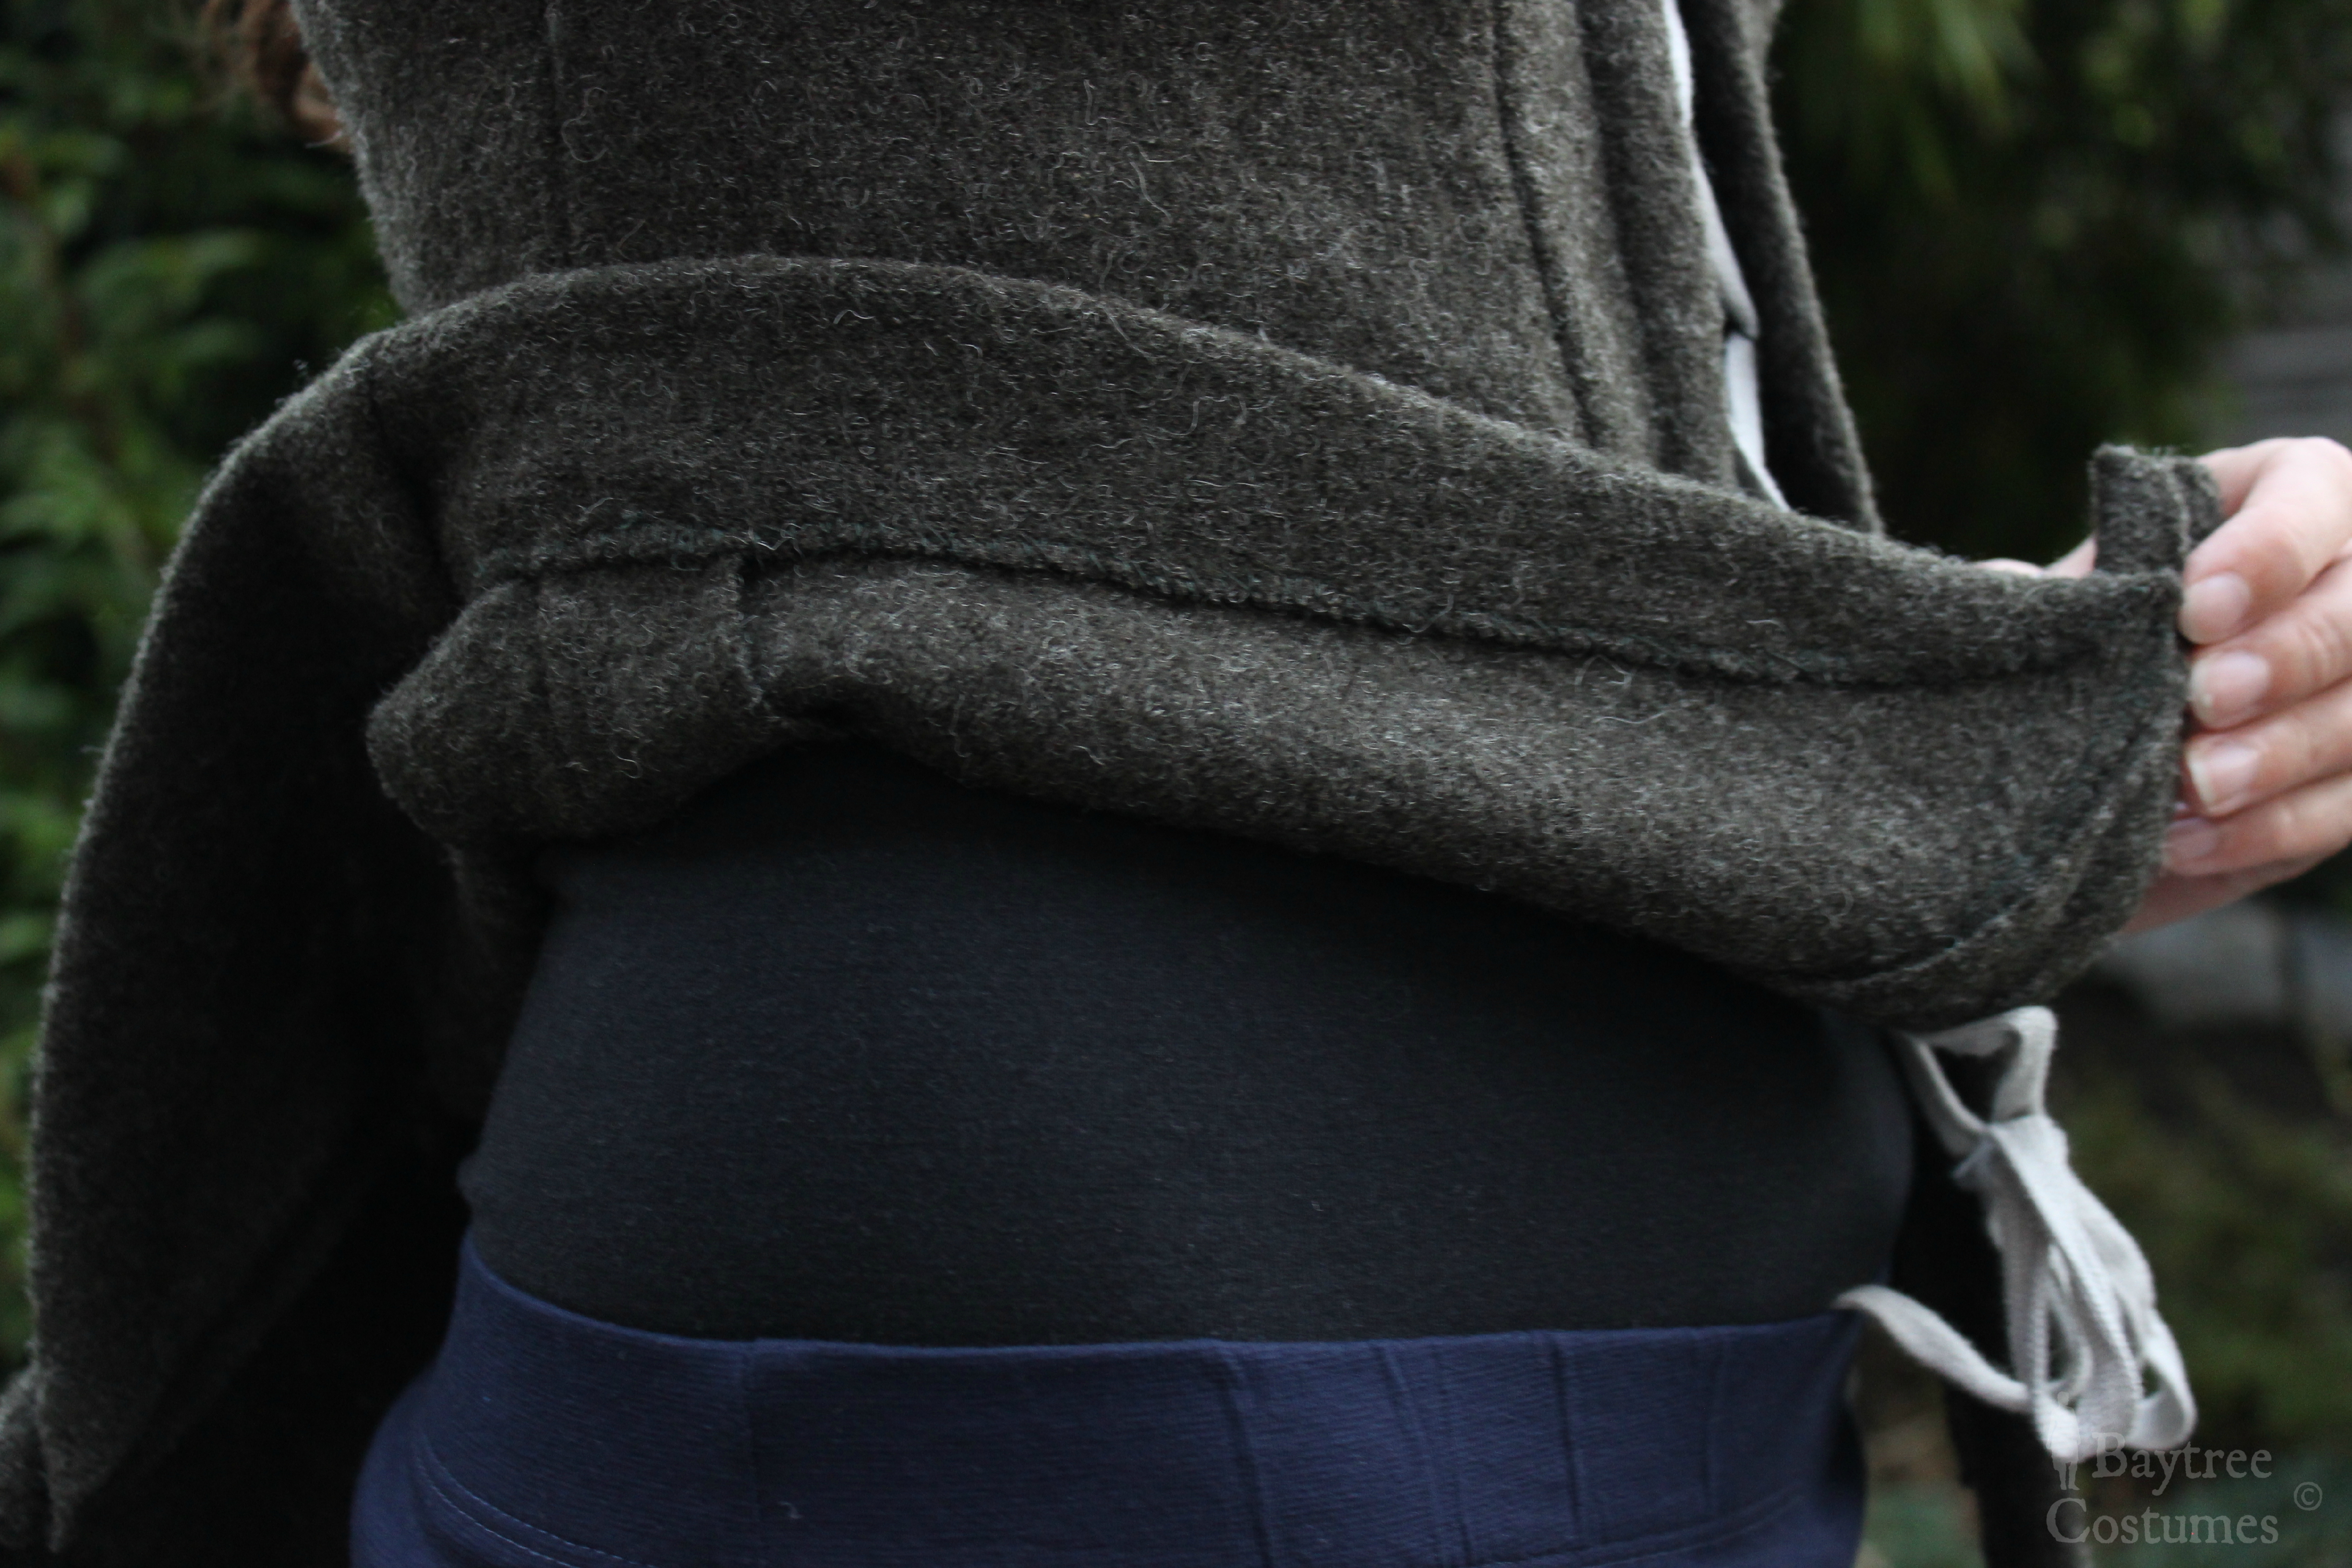
- Attaching the hooks. Step 10: After you have finished all the edges and are satisfied with the unchorded and unsleeved total, place all the hooks in the right places. Claire uses hooks in most of her bodices to keep the lot together and the sleeves are only attached by a chord at the top, using approximately three eyes per armhole (you don’t want to place hooks under your arms). I didn’t want to pierce my fabric, and I didn’t really know how to finish it, so I used some black eyes under the fabric so that you can attach the sleeves as well as the chord in the front.
The method of attaching the hooks to the front: The best place to attach each hook (or eye) is right under the bones you have placed. You don’t want the hooks to peek out, but you also don’t want to place them too far in because you then won’t use the bones to their full right of straightening the front. Right below the bones you attach them in the middle with a few hand stitches using the stitch on the surface (you don’t have to pierce through any other layer than the surface). Where do you place them exactly? Claire has five hooks on either side of the jackets were through she laces it. To determine each length, start from just a little below the top of your bone and mark that your first place. Decide where you want your last hook to be, Claire’s lowest hook is just below or at middle height, and mark that as well. Measure this distance. Divide the measurement into 4 and there you have your lengths in between the hooks.
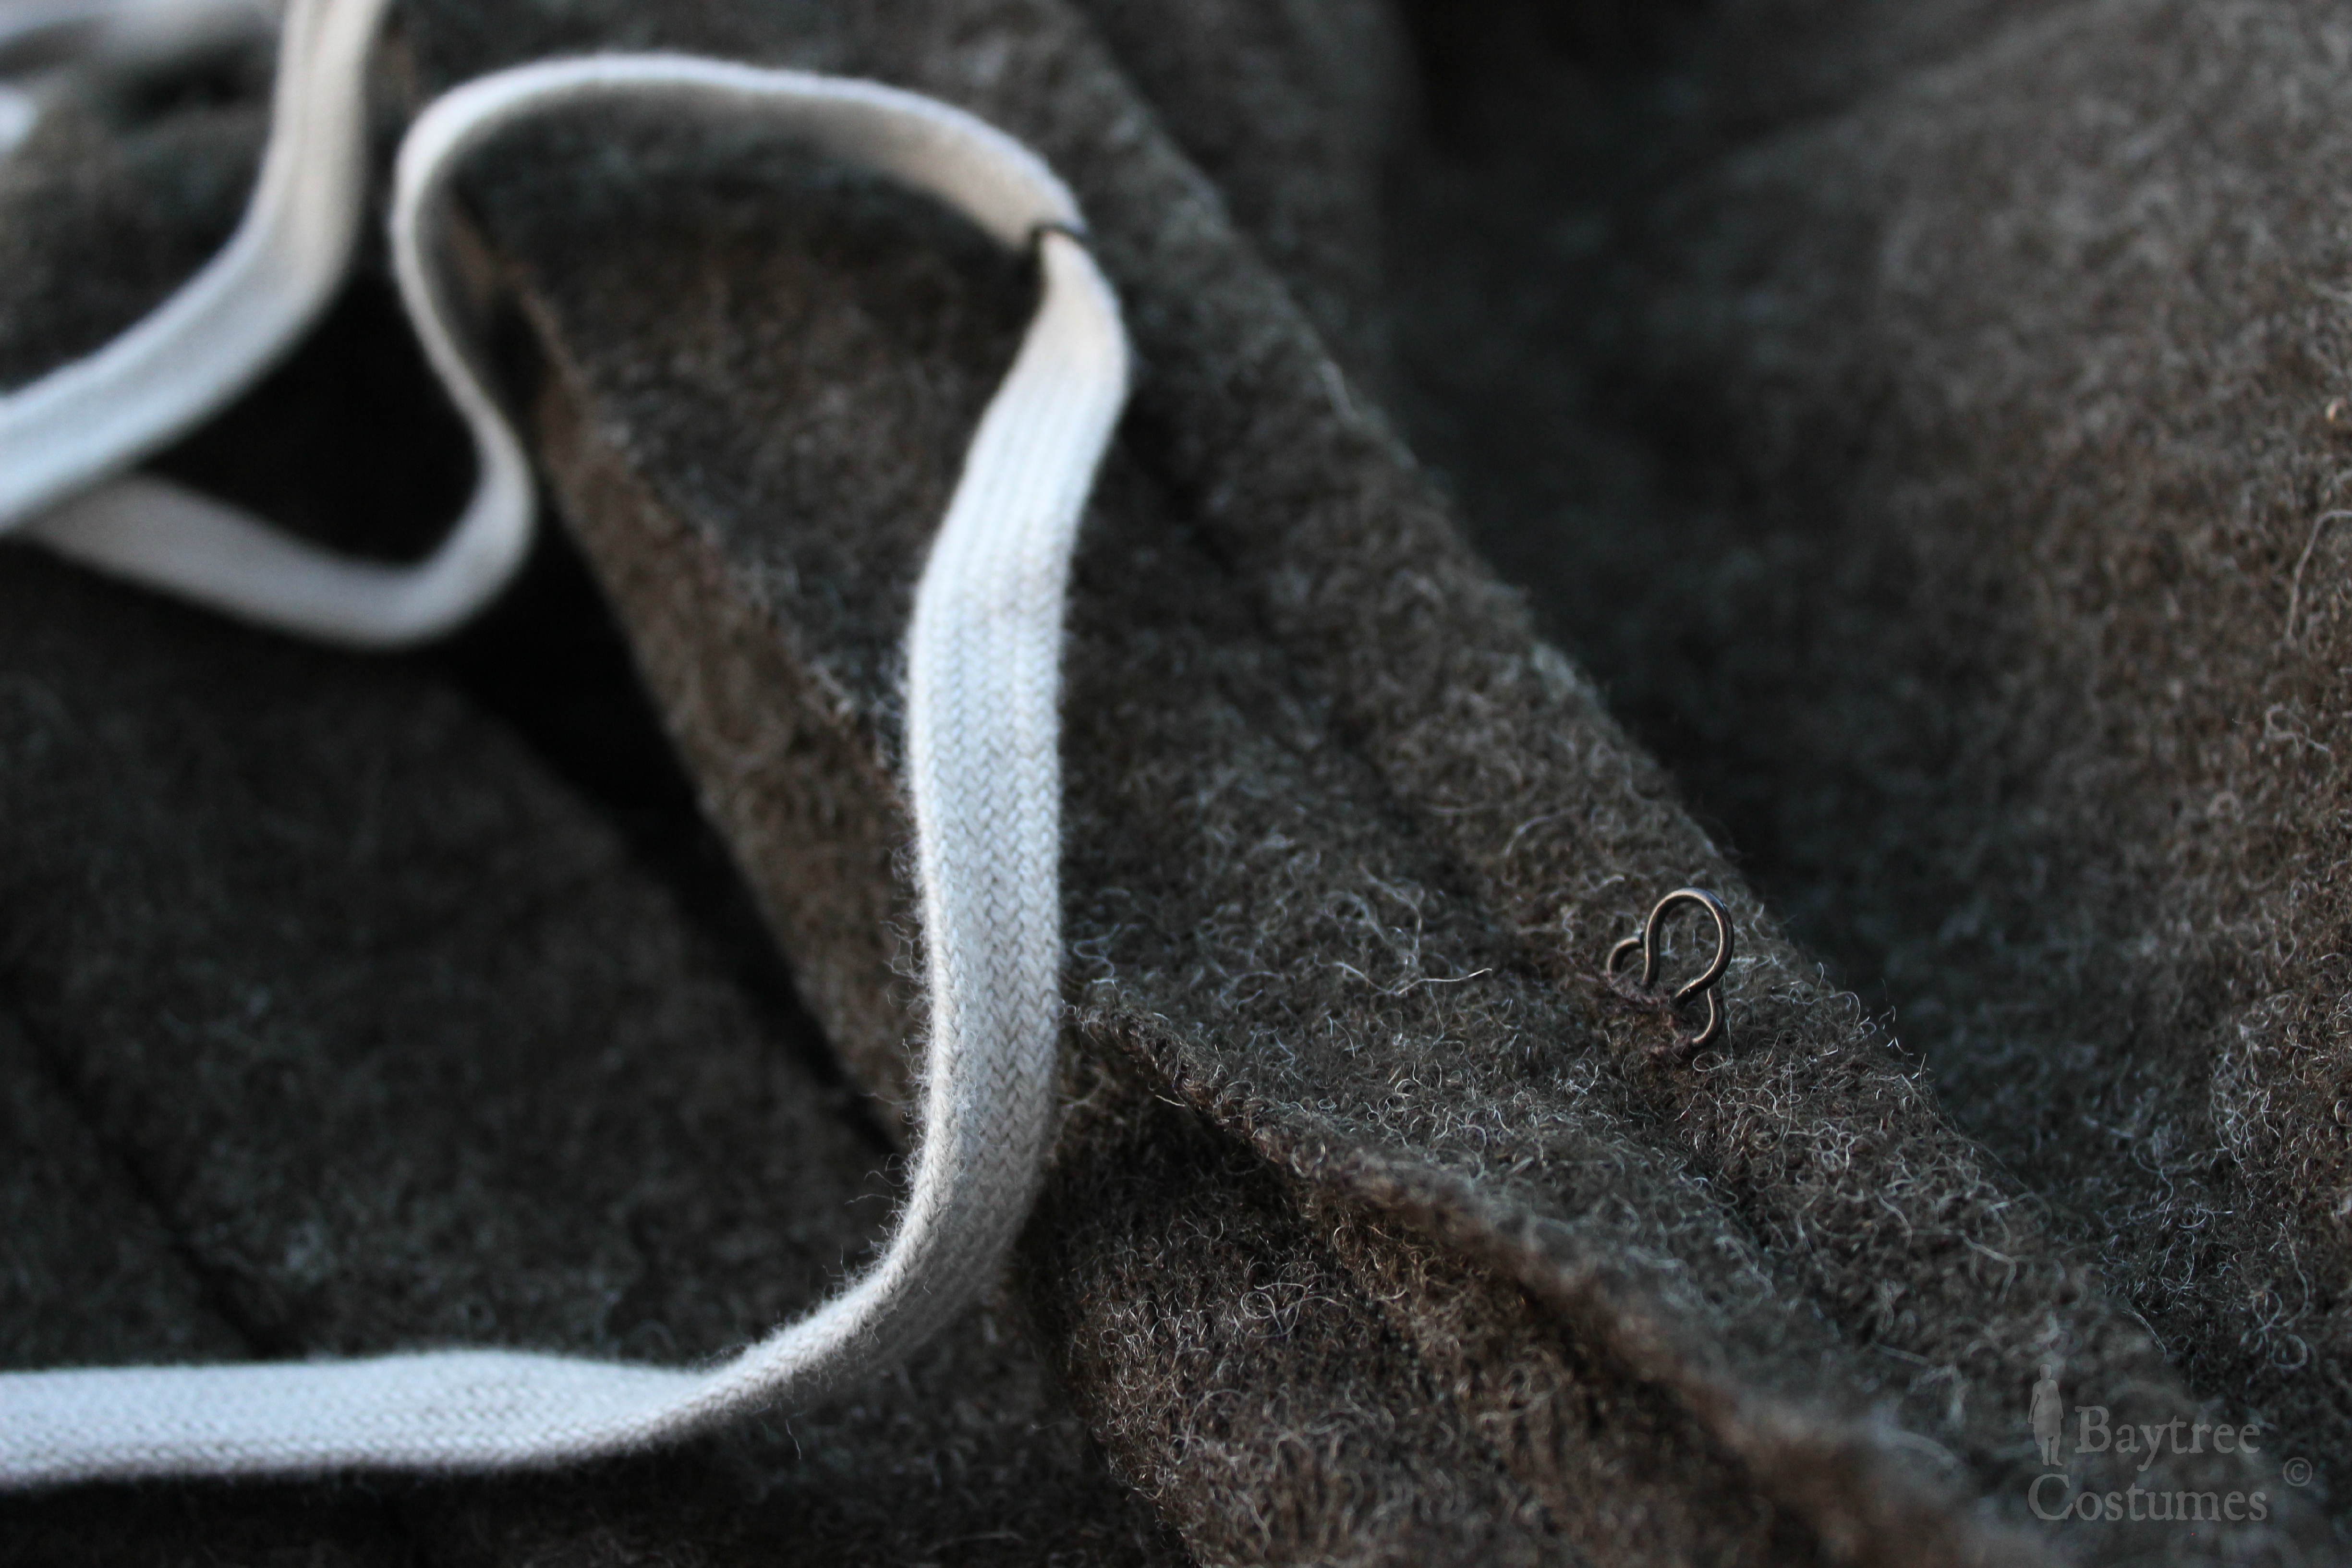
I used eyes and not hooks, because the chord could otherwise snap off.
Sleeves:
- Step 11: The sleeves are easy and since you don’t have to sew the sleeves to the jacket, just get a regular sleeve pattern and get started. I got myself different fabric then my jacket just to mix and match a bit more and give it an extra story-line. I also went for knitted green because it would not only have great texture but I also wouldn’t have to attach hooks to make the sleeve detachable. I just weave the chord through the fabric since it is knitted. The length of the sleeves is about past the elbow or ¾ of your arm. It comes down to your preference.
Stomacher:
- Step 12: Claire’s jacket seems really stiff and straight in the front. This is not only because of the two bone reinforcements, but also because of the underlaid stomacher. Since this topic was a whole project on its own, you’ll have to wait for this one.

Anyway, I think you’ll be busy enough understanding this tiring labyrinth of writing ;).
When you are looking forward to my other articles for my Outlander project, please subscribe by entering your e-mail. It helps me out a lot!
Leave a like if you were inspired and I hope to see you back soon ;).
Ps. I’ll tell you ahead that there are still at least three parts coming for this project. So stay tuned!

Hi! Would you be able to send me o photo of ready cut pieces of jacket with signatures (back, front)? Because I can’t deduce what should I seam together and I am struggling with theese back pleats 😦
LikeLike
Hi Paulina! Thank you for your comment. Sadly I don’t have many photos of the loose pattern pieces. The one that I do have is the one from the article: https://baytreecostumes.files.wordpress.com/2015/08/outlander-pattern-pieces2.jpg. I’ve made a new picture to hopefully clear some pattern frustration up: https://baytreecostumes.files.wordpress.com/2016/06/outlander-comment-collage2.jpg. I cut out every piece twice (in the photo two are already shown as double). I also had a lot of trouble with the back pleats – they are terrible if you don’t know what you are doing! You can try my pattern and some handsewing to sew the added boxes (pattern pieces 4) together. But if you want to go more legit, I did find these articles with a bit more pleat information: http://americanduchess.blogspot.nl/2011/05/revolution-dress-baby-got-back.html and THIS ONE!! https://doxiequeen1.wordpress.com/2016/05/20/making-an-1890s-cycling-costume-part-one/ . I think that article would have helped me so much if it had come out a year earlier. Good luck and I hope I’ve answered your question! Don’t be afraid to ask anything else.
~Ava ❤
LikeLike
Thank fot very much!
LikeLike
Thanks so much! This is GORGEOUS! I’ve been wondering how to get that Outlander look! Thanks!!
LikeLiked by 1 person
Thank you so so much for your lovely comment!!
LikeLike
I was just wondering if you discovered in your research whether the Outlander costume creators only sewed by hand or if they also used sewing machines. If you have already mentioned this I am very sorry. When I was younger I used to enjoy hand sewing clothes but now as I am much older I do not have the time
Many thanks Allyson 😀
LikeLike
Hi Allyson, that is such an interesting question!
I immediately searched through Terry Dresbach’s (Outlander’s costume designer) blog, and found that they do use a lot of handsewing – but I think mainly for the details which get in shot while filming and for things you can’t do without a nice hand stitch. I know for a fact that they use certain special sewing machines for for instance smocking (‘We have this beautiful little smocking machine that operates with a hand crank’ which is a quote from this post http://www.terrydresbach.com/the-materials/ ). A little internet powered proof: http://www.terrydresbach.com/wp-content/uploads/2016/07/IMG_2600.jpg (spot the sewing machine :p), http://www.terrydresbach.com/wp-content/uploads/2016/08/L1001749.jpg (this probably has a lot of handsewing in there) and here in the comment section http://www.terrydresbach.com/the-materials/ one of the costume department members comments that she put 3000 hours in working on the wedding dress, stating that a lot of hand sewing went into the stomacher and other parts of the dress. I think most of the embroideries in the show are also done by hand :). So.. that’s a lot of devotion going into those costumes! I hope I have answered your question! And I agree that hand sewing does make costumes and garments look better because you have all the control over your work, but.. we don’t have the time..! 😉
~Ava
LikeLike
Thank you for the great info. Just beginning my Ourlander costume and your blog is very inspirational. I want to read the others you wrote.
LikeLiked by 1 person
Thank you so much for your lovely comment! Feel free to look around ❤
LikeLike