
My first freshly pressed costume how-to / tutorial / how-I-made!
This semi-corset is easy to make, looks great and requires little sewing skills.
Expensive boning? How about zip ties? Yes indeed, it made me feel like a costume hacker.
Please note that I am not a professional. Costuming is a beloved hobby of mine, and with that sometimes come lazy solutions that provide that non-professional yet brilliant and beautiful outcome for those less experienced. Also it would be appropriate to point out that this is, in fact, my first real costume project.
Making this semi-corset took me about 3 days in total, and it was a project to happily make mistakes with! Believe me, I can now. And because I did some things wrong, I thought I would lay out my entire process for your inspiration in the hope you do not stress the same as I did ;).
This corset was part of my Suaip Culaidh Scottish Outlander project. That costume is loosely based on the eighteenth century, yet I did not want to bind the style and look of the corset to this century in particular since I liked to keep it “timeless”. This way I could use it for any project in the future. You can use it to base a robe a française all the way to the decoration of a fairyqueen or even steampunk costume.
Regard this corset an anything-you-like corset, or just a garment of loose morals.. ;]
Who has words at the right moment?
– Charlotte Brontë

A corset is a beautiful feminine and quite ancient garment. It has been used throughout so many centuries. Still, you should know that it is as beautiful as it is uncomfortable. I wore this to a convention for an entire day and, boy, my back felt uneasy at the end of it! Haha.
Done with the talking business, let’s start. I’ll try and break my process down for you, and I hope you’ll feel inspired afterwards.
To start with the actual sewing how-to, fast forward here.
General research
Research equals half the work. It is really true that half of the time (maybe even more!) I spend on projects consists of research. It is the most exciting part of a costume and gets you entirely in the mood to get through your sewing faults and successes.
You will be shaping your idea and getting inspiration from all over the internet. Particularly when you bind yourself to a particular period or a film or TV-series. You get to know the looks and how true you want to stay to the original. In my case, I was not going to base it on some style exactly. I wanted it cheap and easy enough for a first semi-corset, and so I quickly found this hobby concept of a zip tie based design.
The main article I used as my inspiration is this lovely and clear article from the blog the Mrs. Definitely check that out! She also provides an Elizabethan corset pattern generator in her article, which I used for my main outline. I altered the shape quite a bit after that, but you could say my style is closest to an Elizabethan corset. The site that has the corset generator was also one of my most useful and insightful source since it explains everything from fabric to pattern.
Necessities
For a non-professional zip tie, yet functional and neatly frayed edge corset, you’ll require:
– Plenty of sturdy fabric (enough to fit two corset patterns)
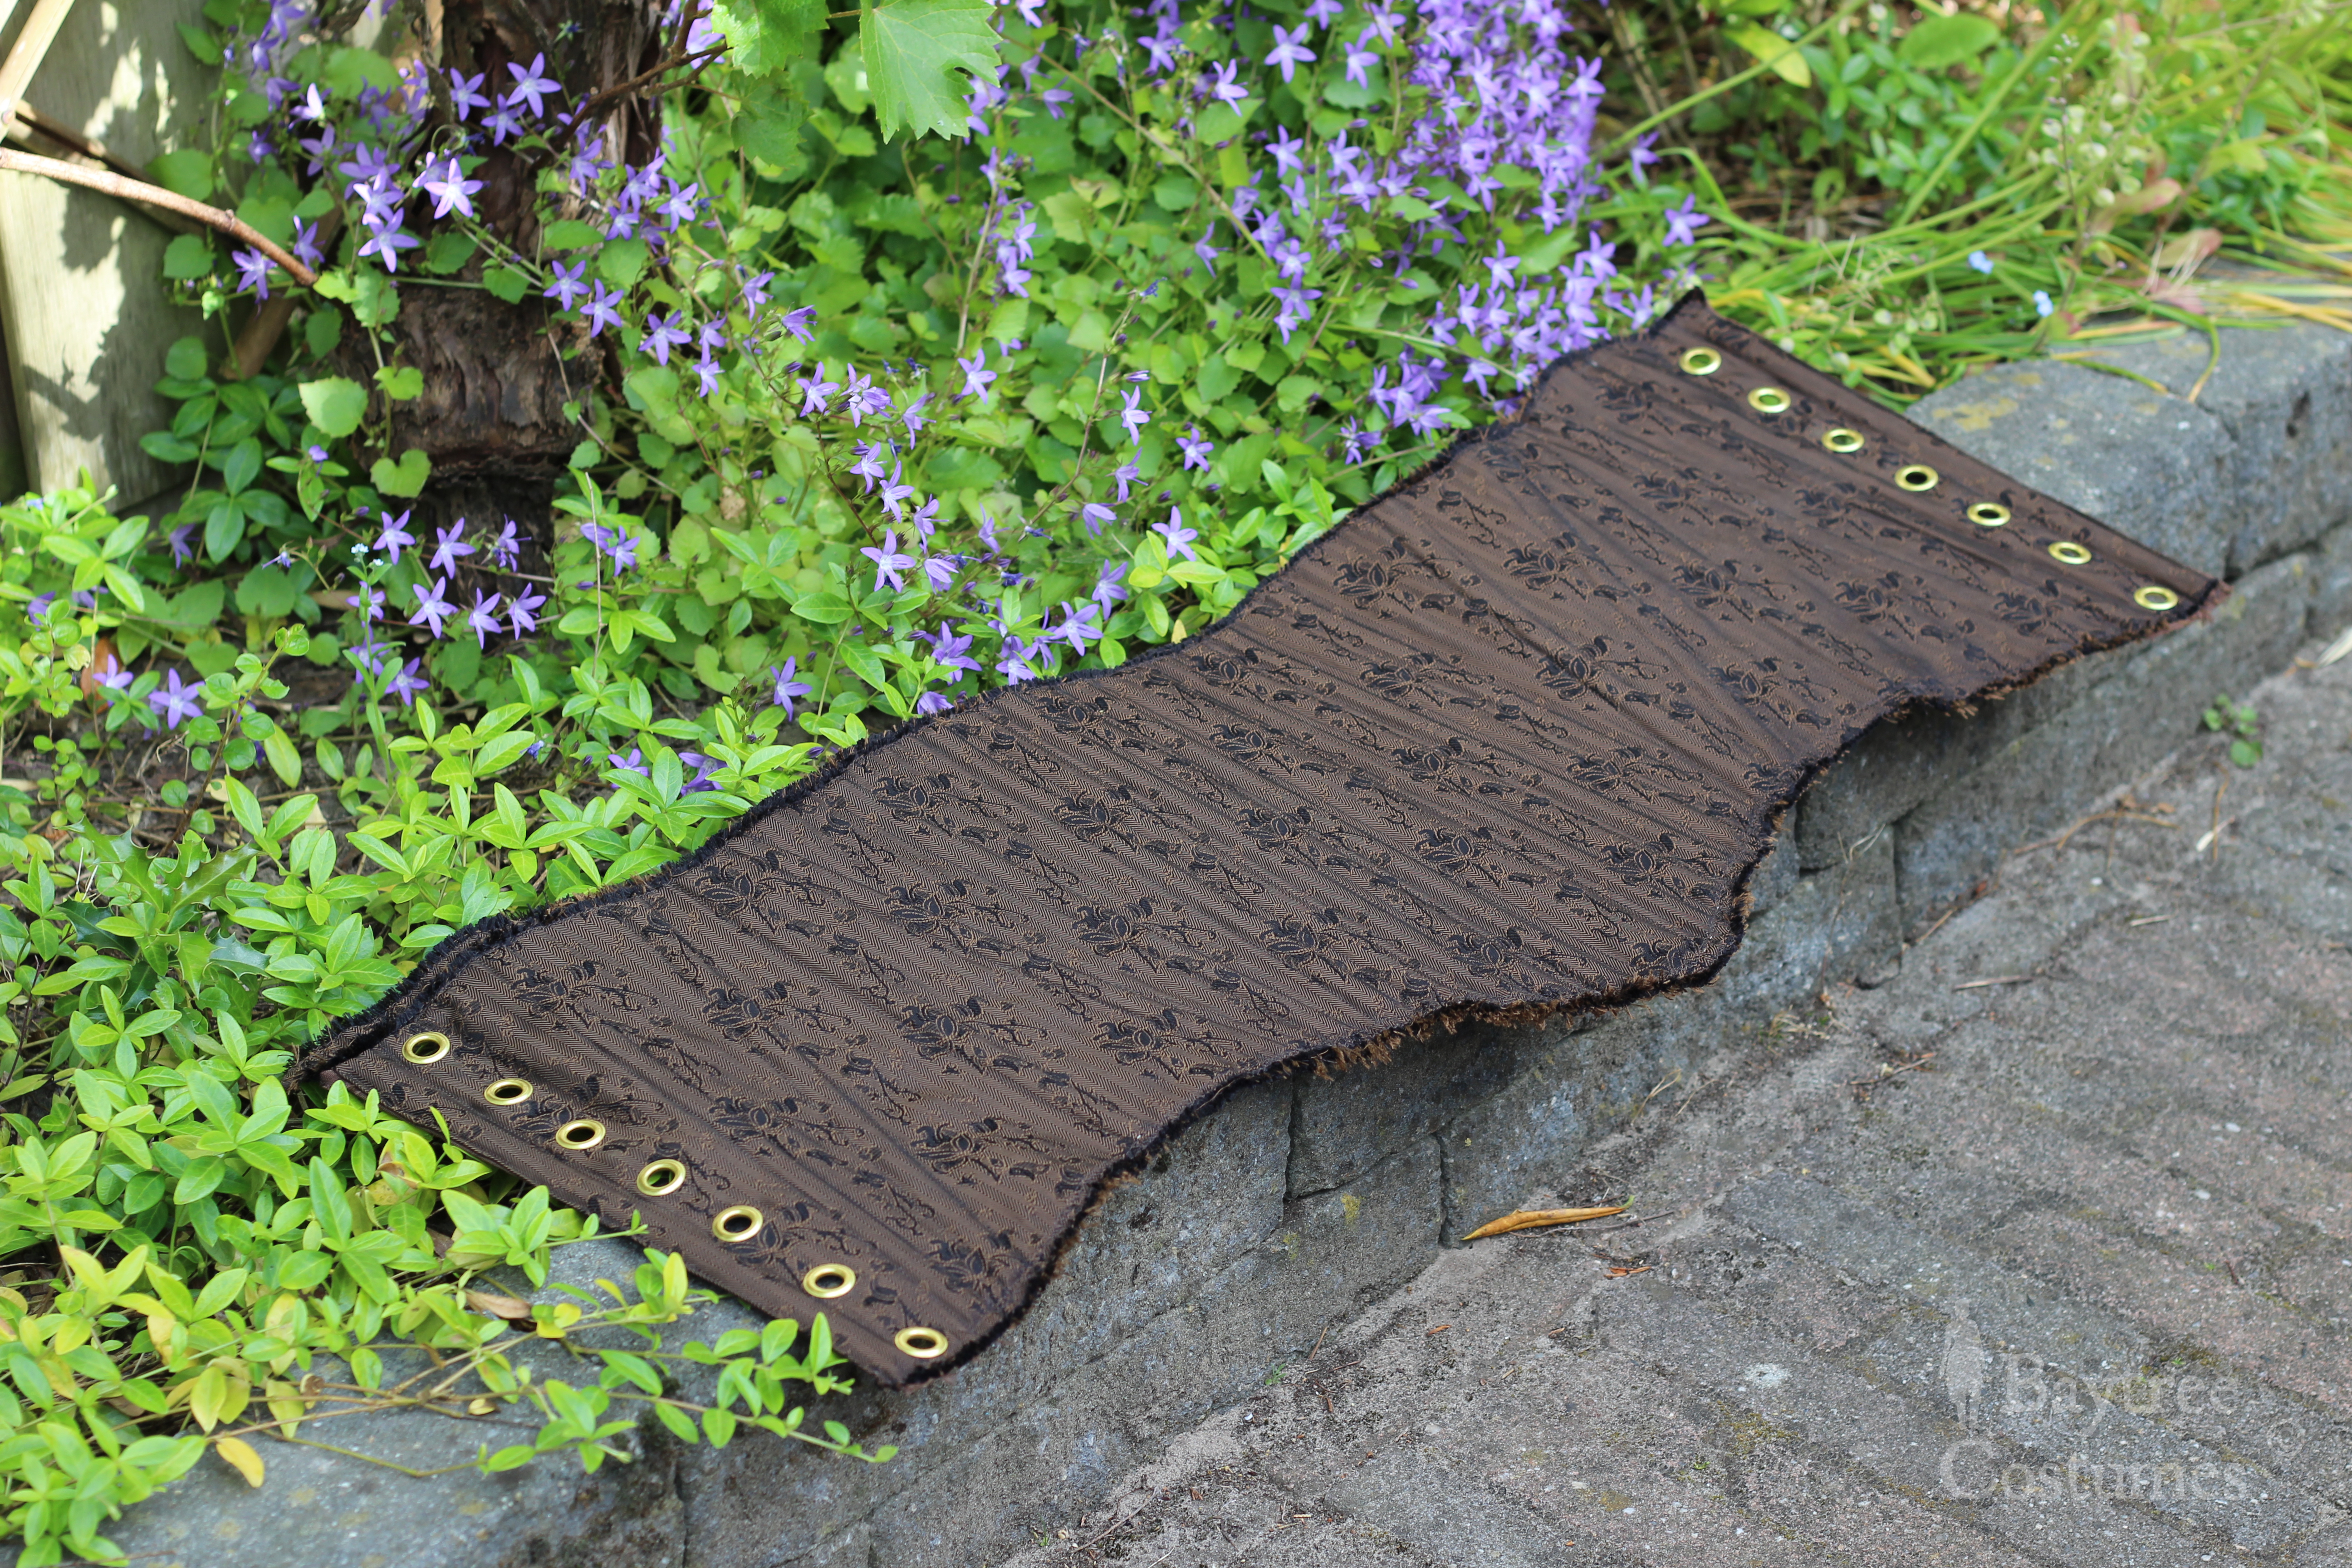
– Grommets (I used 11 millimetre golden grommets, 7 per side = 14. As you’ll see later, these are quite big). I bought a pack of 15. My grommet kit came with a grommet setter.
– For the boning: a pack of 50 or 100 zip ties, depending on how much boning you’d like. I exactly used 48 zip ties (now that is economy! *grin*).
– Some sort of tape to keep the zip ties together (I used masking tape)
– Ribbon to tie your corset in the back: bias tape, organza ribbon or what I used: satin ribbon.
– Your usual sewing gear: matching thread, sewing machine, chalk, ruler etc.
The fabric
For my fabric I used a lovely sturdy, non-stretch, floral and herringbone patterned brown fabric. The fabric type was called “memory”, which probably applies to the fact that it flattens smoothly when you stroke it, and stays in place when you shape it. It was quite cheap! It only cost me €3,- per meter. I’m even more satisfied with my work when I know I have made it cheaply. Just an economical characteristic of mine – which does come in handy.
I would recommend for you to get a sturdy fabric as well. What really came in handy with sewing was that four herringbone pattern channels were the right size for the bone channel lining so that I did not even have to manually create a straight line. I just had to watch the pattern. Of course when the boning became diagonal, a straight line was a lot harder to achieve. More information about traditional fabrics and which you could use nowadays I found here.
The pattern
I realised while I was cutting my pattern that my usual fabric economy kind of went wrong.. Because, yes, I had forgotten that you of course have to cut out two parts of the corset pattern to enable the boning channels. It made me have to stitch on two pieces of another fabric that I had on the inner layer. Though it resulted in a style I wish I would have created on purpose rather than stressing through it, it all worked out well in the end.

I imagined the pattern lying on a piece of 140 cm x 90 cm fabric correctly. The 90 centimetres were just enough since the height of my corset was going to be around 40 cm.
I created the corset pattern by drawing it out on a piece of newspaper and altered it through fitting (yes, the newspaper) and observing how it would fit once you cut it out. This part took me so long, since every time something would not have the right shape or was not in the right position. I especially found it hard to make the back perfectly vertical. It takes practice, but I got to a good result in the end. The curves nicely flow around your hips to create more comfort. When you want to prevent your hips from popping out under your corset, you could alternate the design by adding (boned) tabs. Perhaps I should have, now I think of it (*angel face*).
The pattern of the boning is something I shall address in an additional paragraph since that is quite another matter entirely.
Tip!: Make sure you leave enough room on the back so that you have enough space to tie it when you put it on. You always come short of space, I know I did.
Sewing step-by-step
When I was finally satisfied with the pattern, I got out my sewing machine and set it up. Now.. Where do you start? That was immediately my first question.
1. First you should align your pattern with the pattern of your fabric if you have to. With my fabric I had to make the herringbone pattern as well as the placing of it central and vertical, which requires some puzzling. You can use pins to locate your straight lines on both sides for when you cut two layers at once later. When you use double sided fabric, you shouldn’t worry in this step since the two pieces are symmetrical and identical.
2. You should cut out the corset without any seam allowance on the top and bottom, which is of course a very scary thing to do. The left and right will be seamed, so those you can cut with seam allowance. I created a rough edged corset (secretly because it is quicker and easier), and in the article the Mrs. Lannis created a ribbon edge. You could also edge it normally, but I liked the look of the fluffy edge the fray would give. Irregularity and texture give your costume character, remember that! I first started cutting out the pattern pieces with the right seam allowances two layers at once. Which means you fold your fabric into two and cut your fabric out twice in one go, so that the pieces are identical in the stretch of the word.
3. I additionally zigzagged the two pieces seperately in advance since the threads were already unbinding after cutting. This sets how far you want the threading to go.
4. If you follow my rough edge or the ribbon finish, you can safely proceed. See the paragraph alternations if you want to totally seam the edge of your. The next step is to seam the most left and most right side of the fabric. Lay the two pieces on top of each other wrong side out and sew straightly along the outer edges that you have cut with seam allowance. Finish the seam the way you want and fold the corset inside out. Also you should close the top of your corset by sewing the two pieces together there. This will leave an opening at the bottom for when you will insert your boning later. Again, remember: how far you close your corset on top, how far you border your fraying.
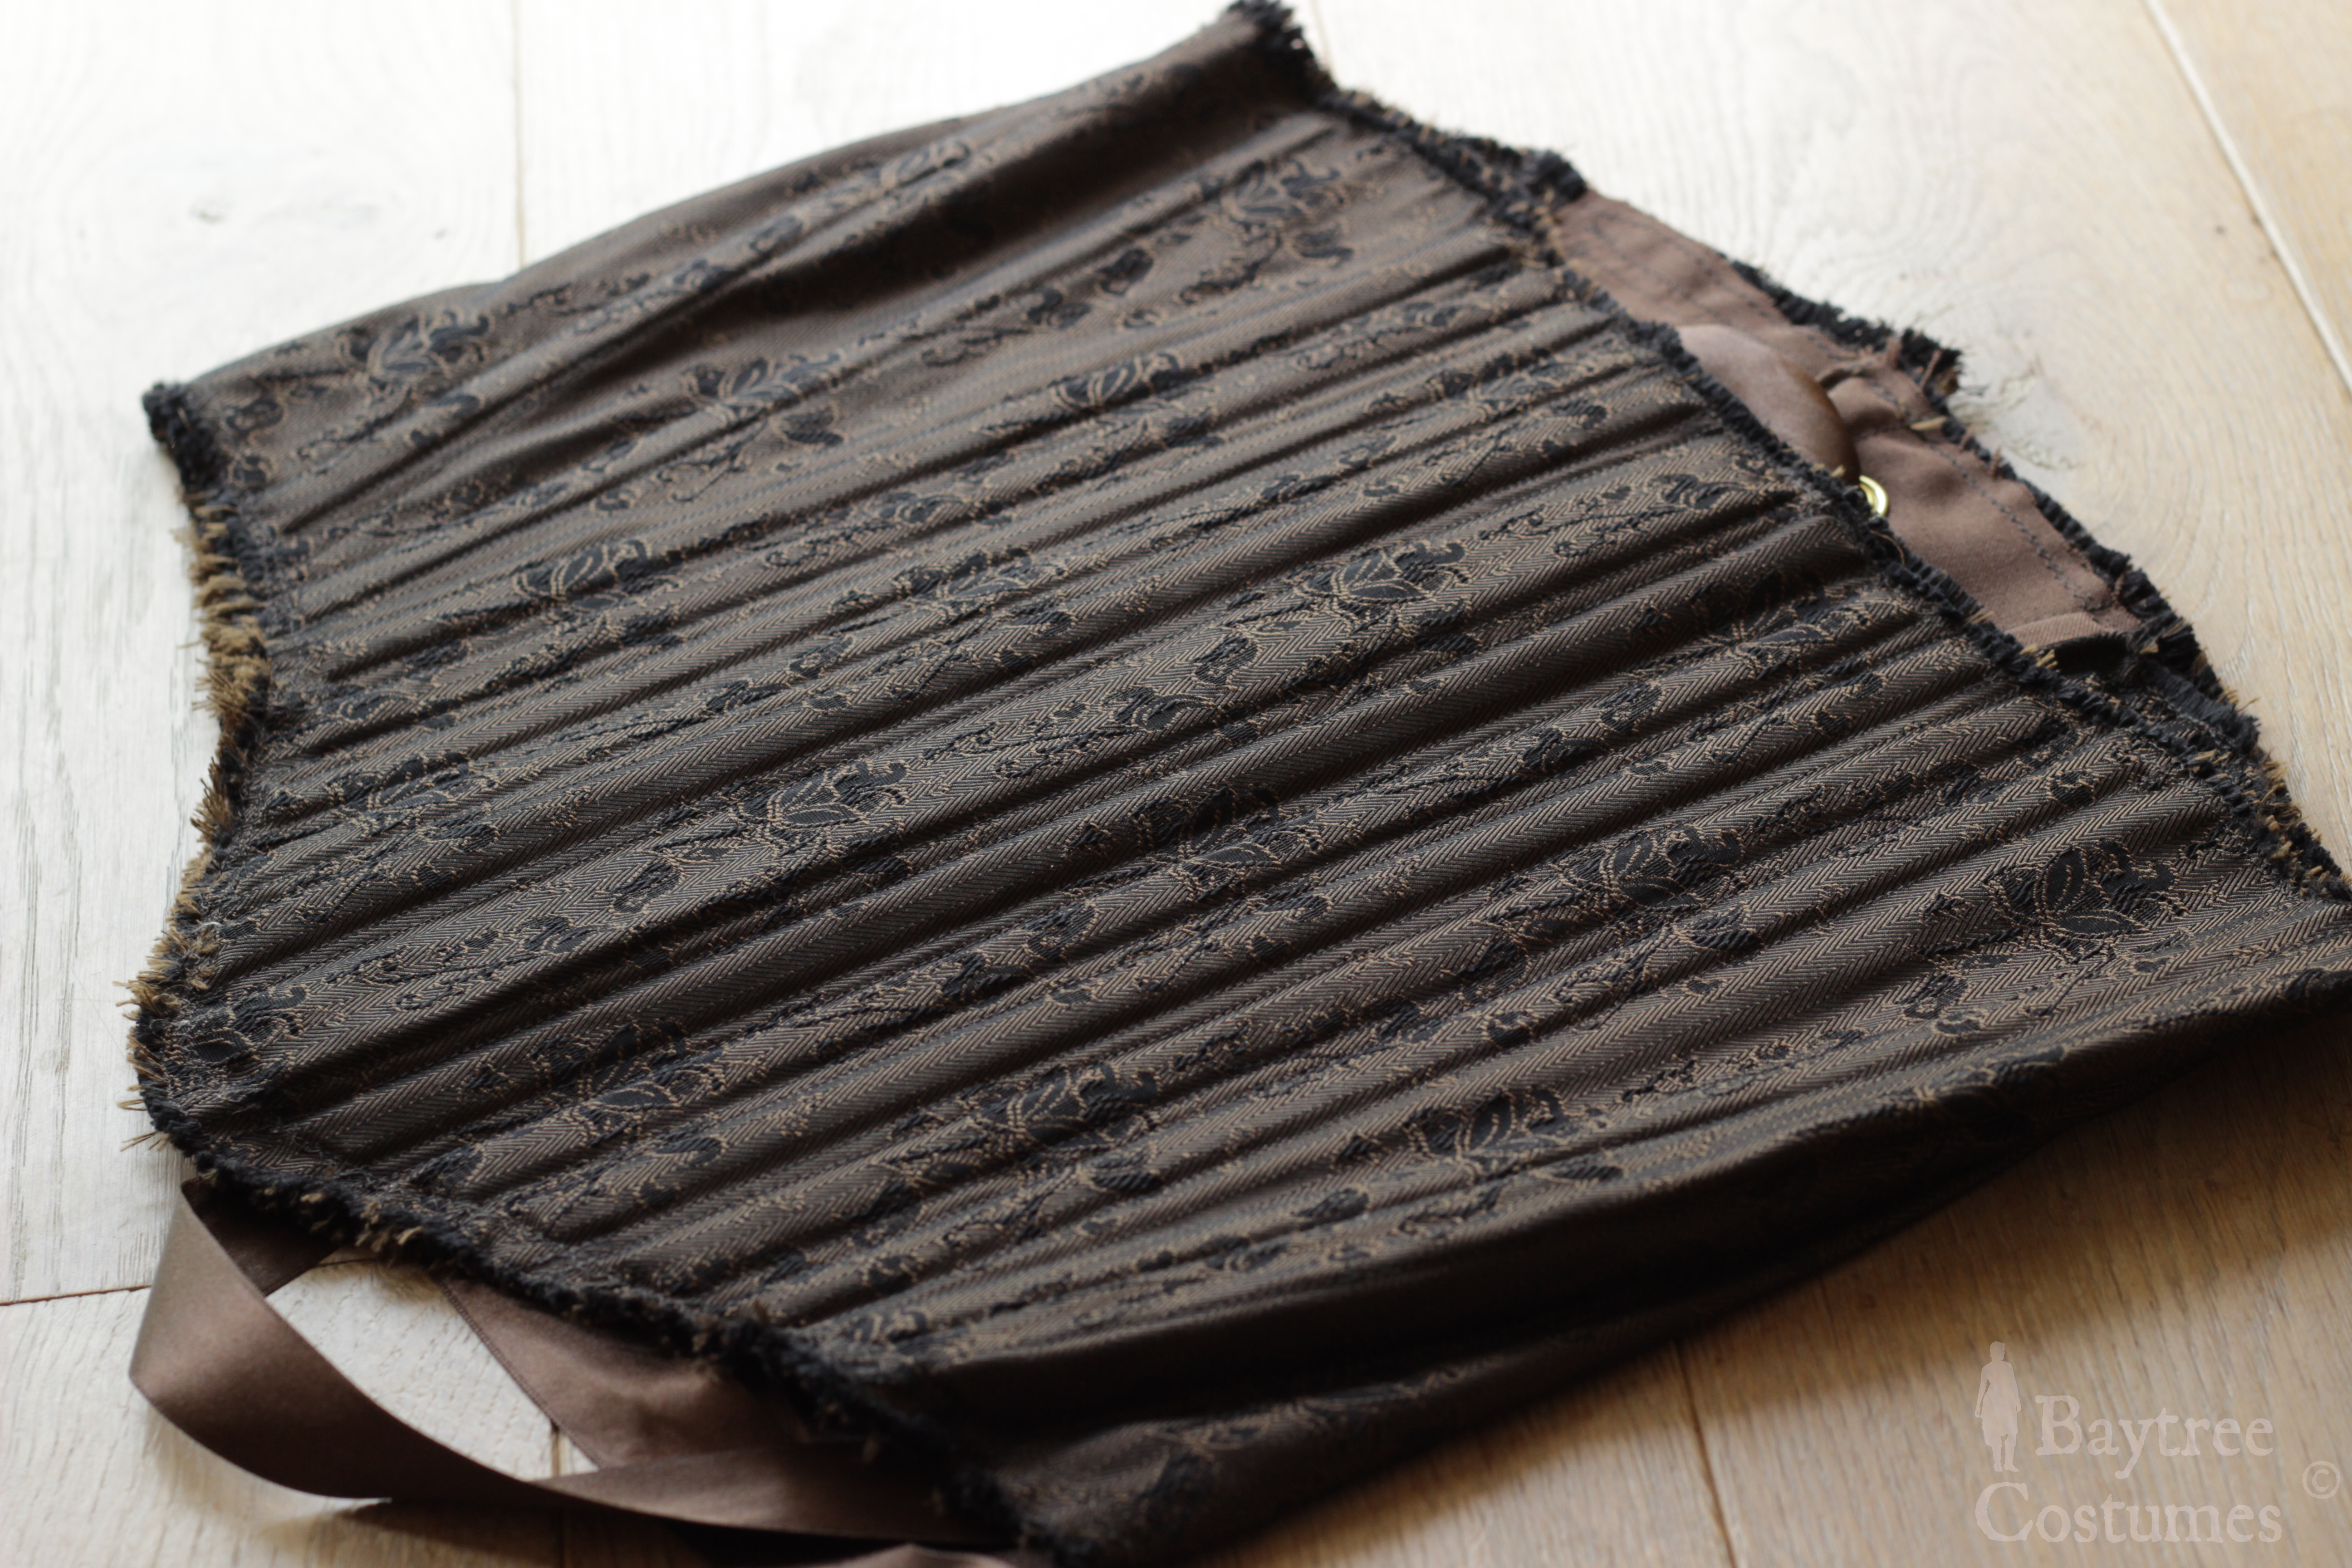
5. Now it is time to create the boning pattern. On the corset pattern generator they provide a guideline for the placing of the boning. It says that it doesn’t really matter how you put the boning as long as it is symmetrical on each side. Loosely using the given diagram, I created this pattern.
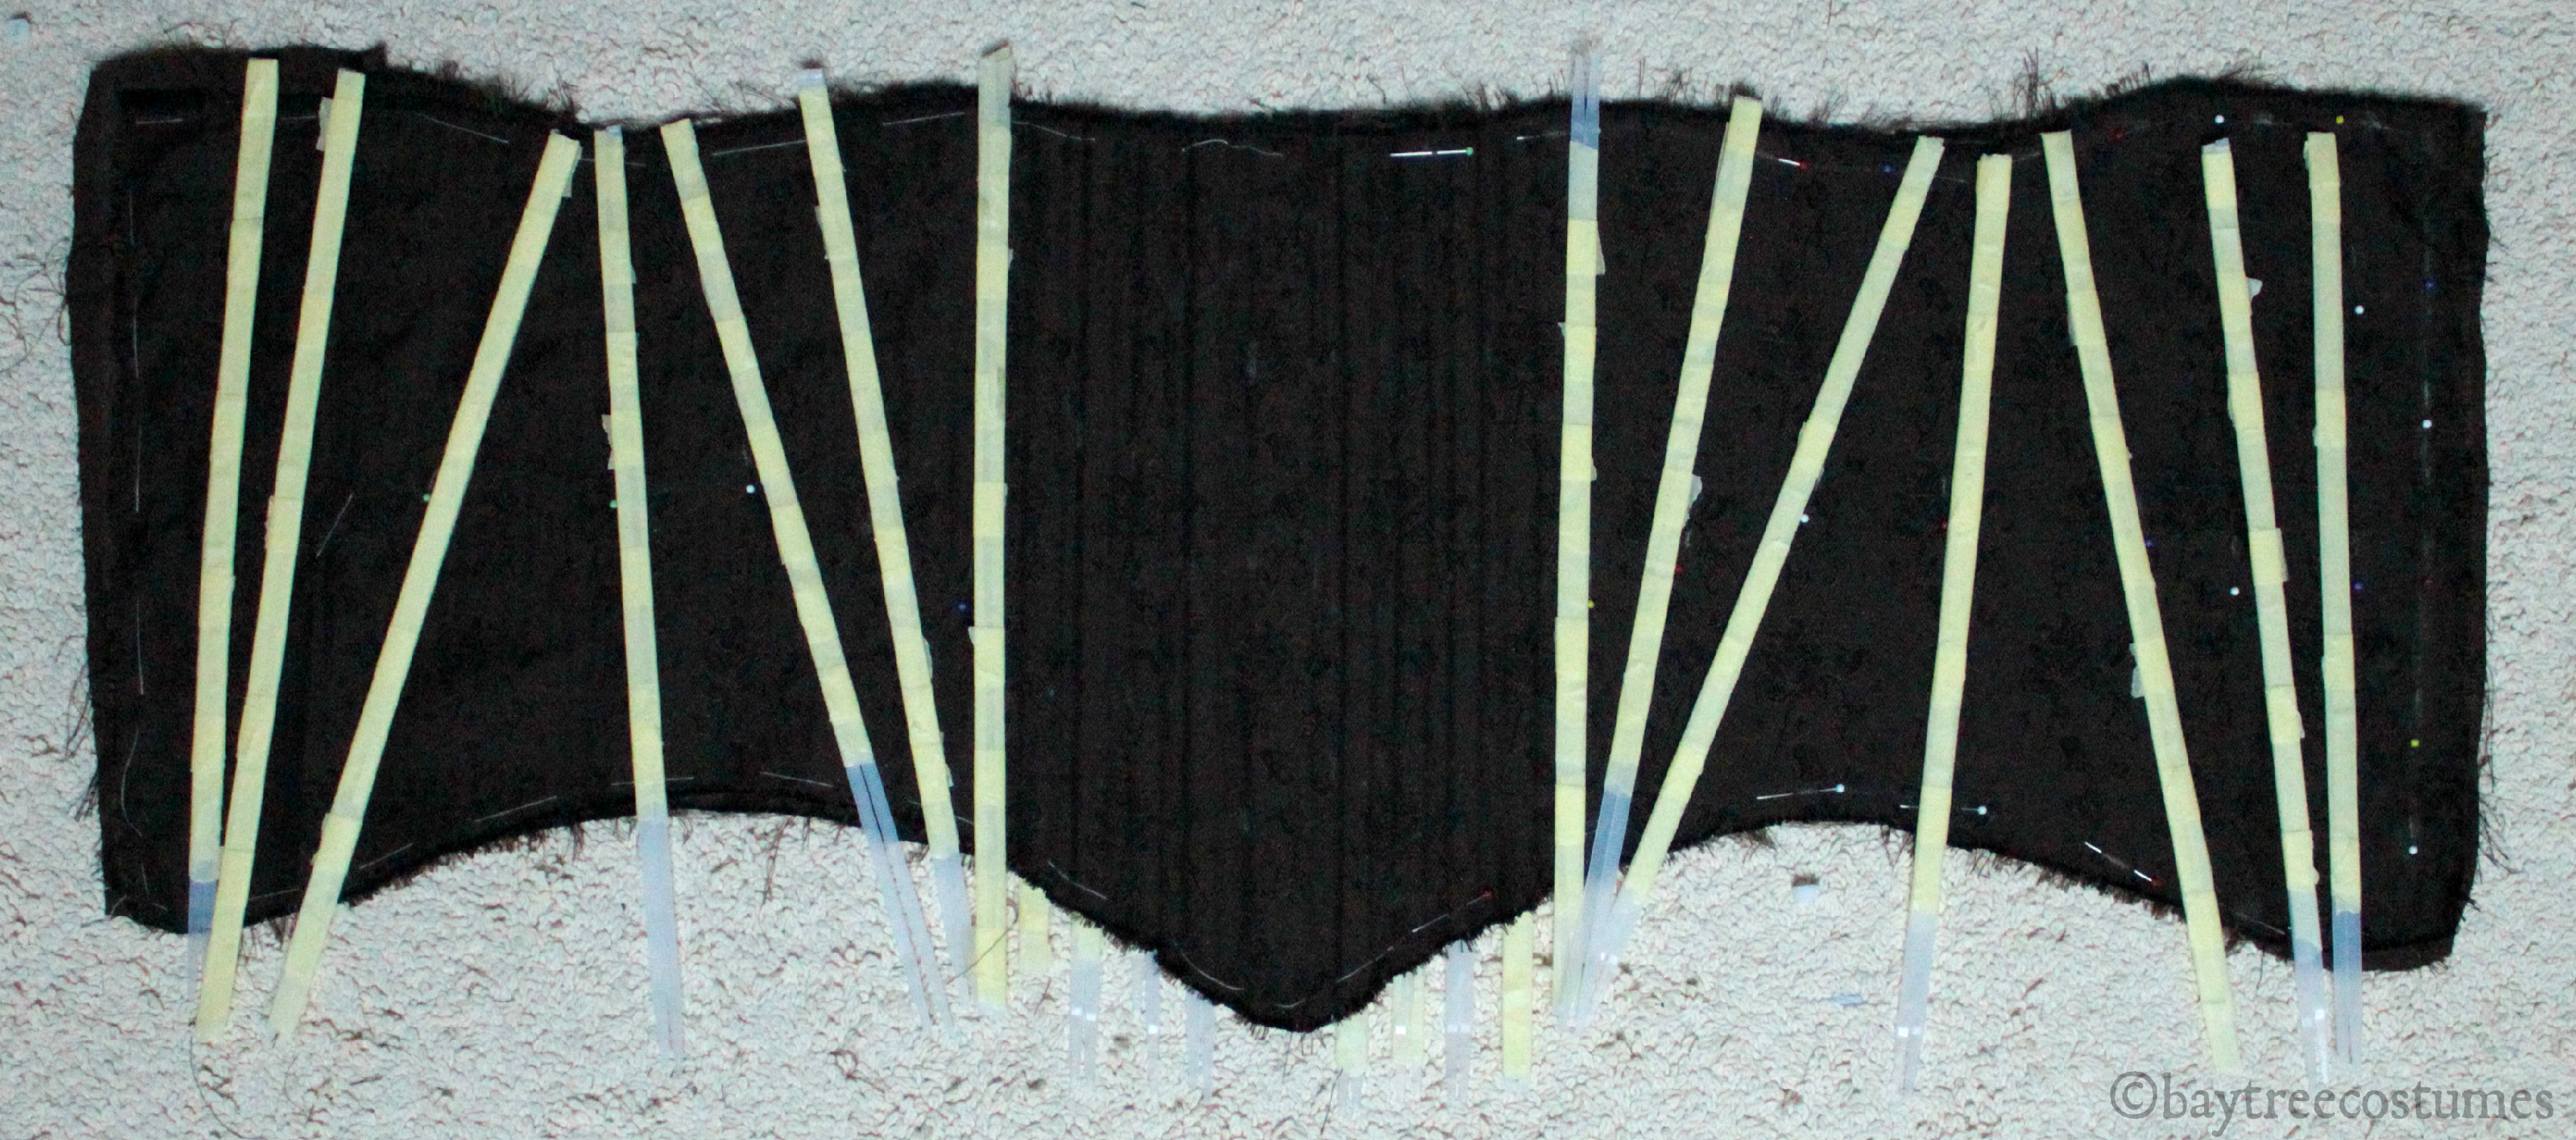 You should also bone the far left and right of your corset to reinforce the grommets, something I didn’t show in this picture.
You can see there is one central thicker strand of boning in the centre (which is called a busk), then a few vertical ones to provide sturdiness up front and then diagonals that guide the shape along your sides. One vertical before the grommets and one to close the seam and provide a straight and sturdy finish. The way I placed the boning will result not too sturdy and straight since I did not use that much boning. I wanted it to shape a bit more… naturally. Firstly, draw the pattern you’d like on one half of your pattern. I used 2 zip tie wide boning and in the centre I used a 4 zip tie wide busk. A 2 zip tie wide channel with half a centimetre allowance on each side was just perfect. 2 zip ties together is perfectly 1 centimetre so I drew 2 centimetre wide channels.
To draw your lines symmetrical on each side, fold your corset into two and pin across every line. On the other side you can now with help of a ruler and chalk create the same pattern.
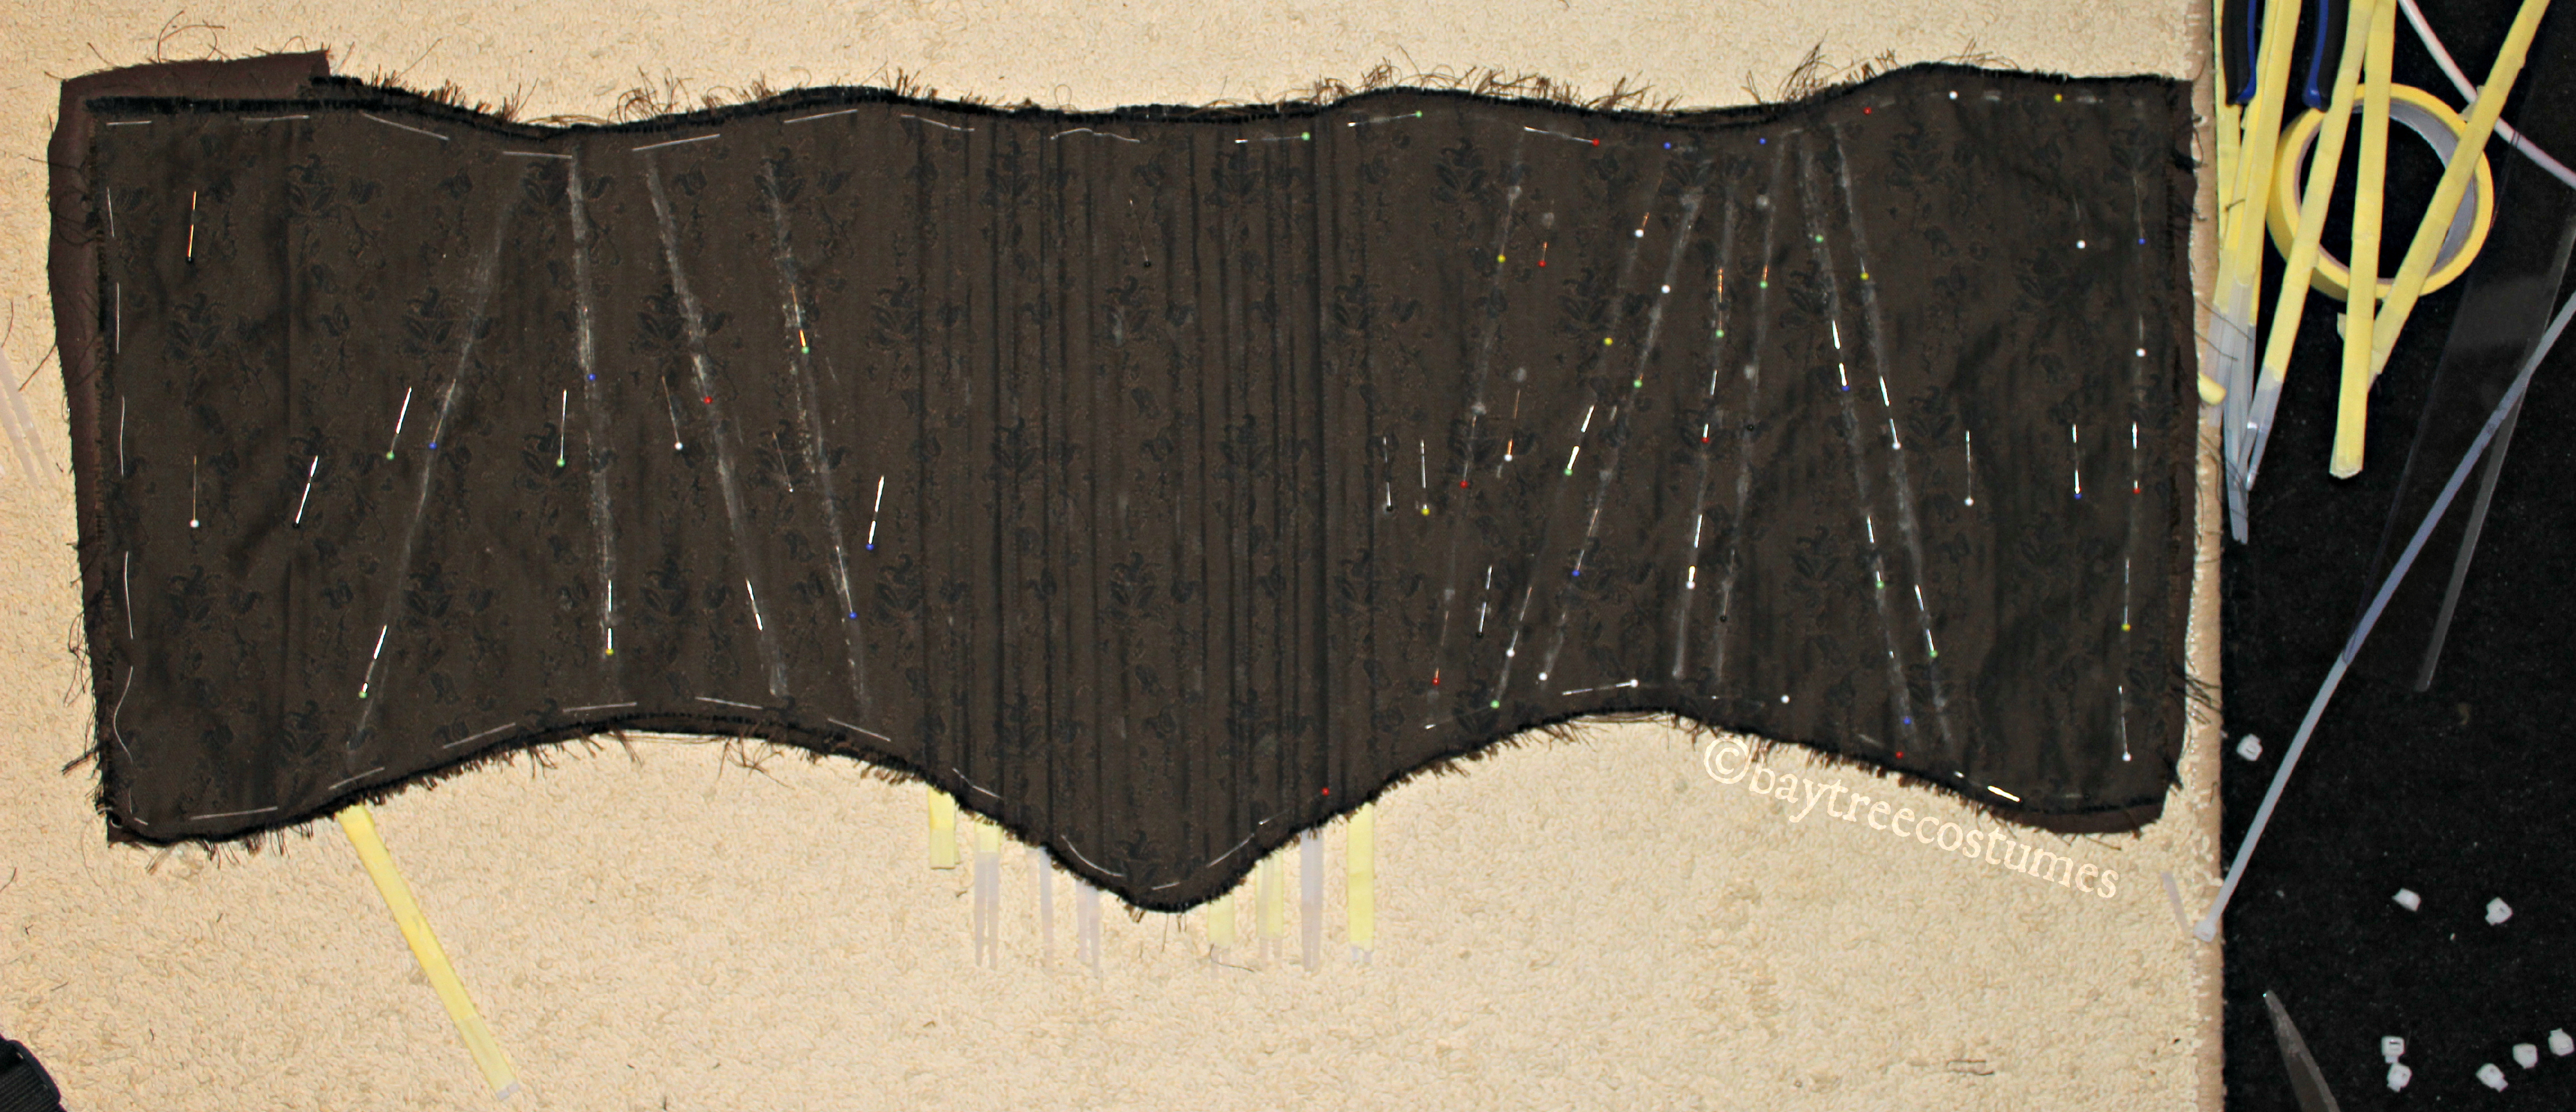 Excuse my bad photography here. You can see I did not even seam the right and left side before sewing the channels. Silly me.
6. To prepare your semi- zip tie boning, I used 48 zip ties in total for the boning of 22 channels and 1 centre. Cut off the head of the zip tie and use the masking tape to tape them together. I taped until I did not see the zip ties anymore, just to be safe that they were indeed sturdy enough.
7. Now that you are ready to sew the boning channels, do just that! Check once in a while if the boning actually fits.
8. Insert the boning carefully and alternate the tape when one is stuck.
9. When you are satisfied with how it all looks, cut off the zip ties properly to the right length and remember to leave some room on the bottom for when you finish the edges.
10. Now it is time to finish your edges. If you use the ribbon finish, I would recommend you to check out the article I based my project on. If you use the fray edge and your fabric does not really fray itself, try to fray it by hand. Make sure you close all the channels and create a safe fraying border. It is probably necessary to trim your fraying, so get a pair of fabric scissors and cut them to the length you desire.
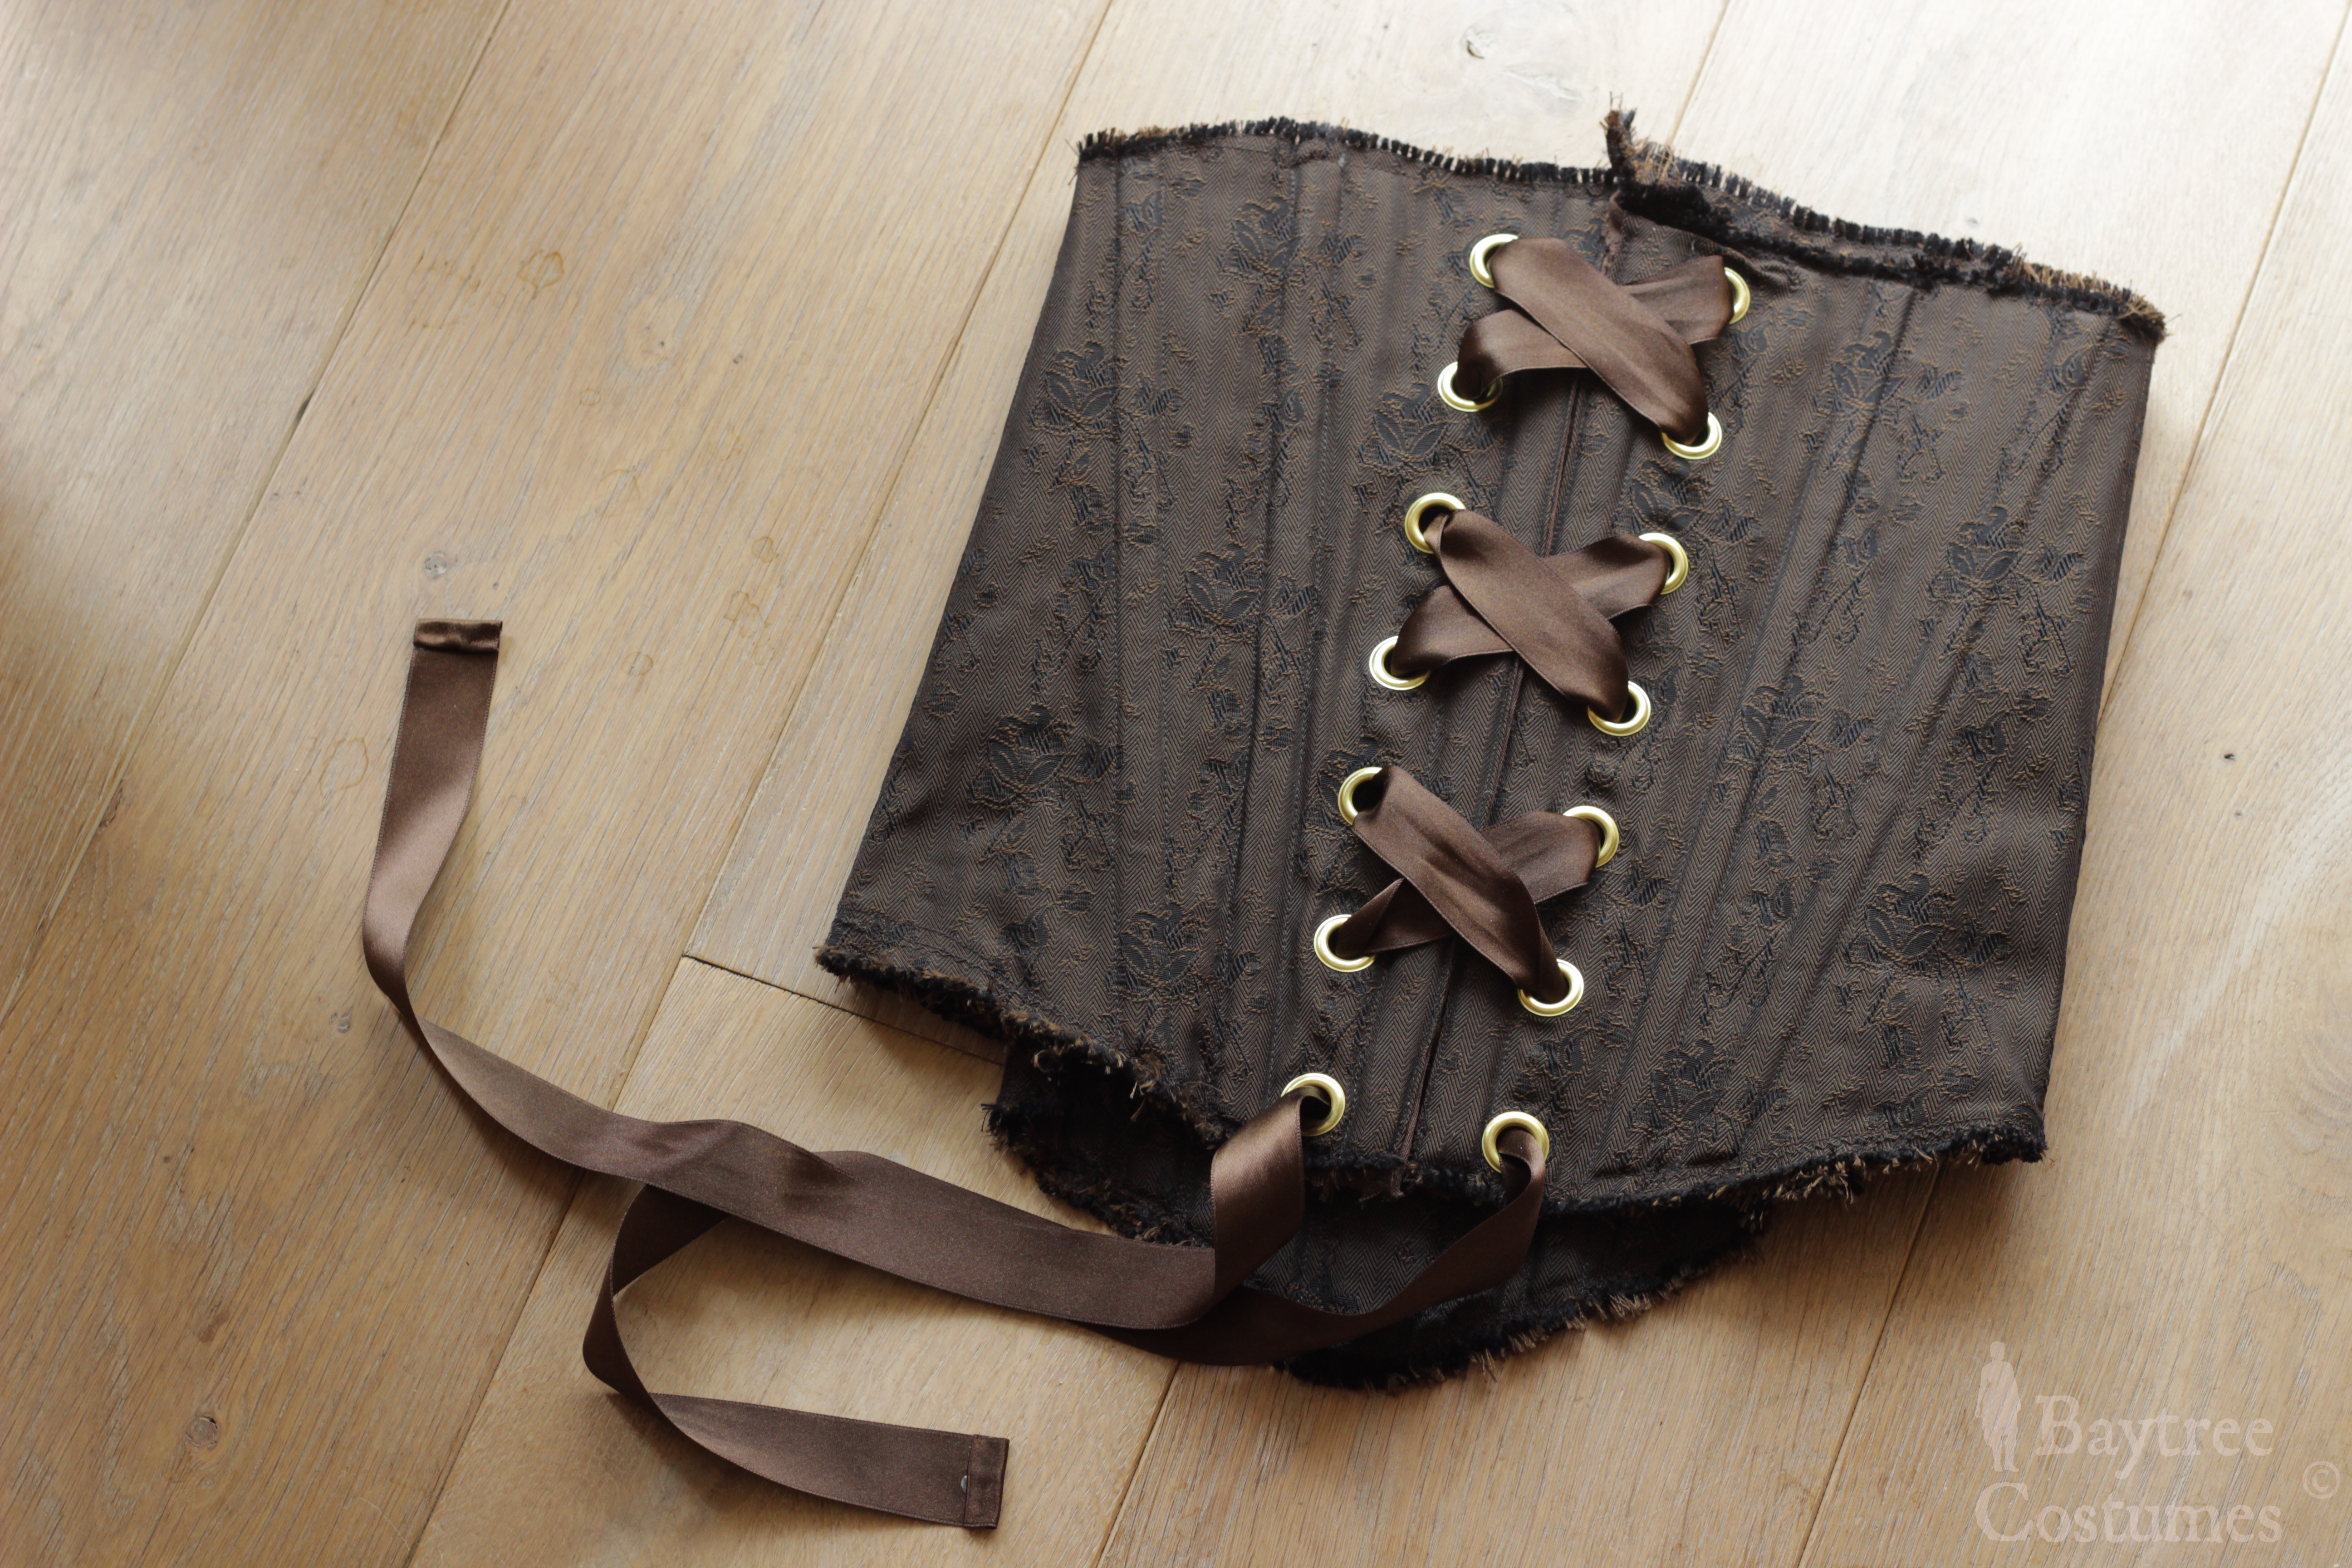
12. The last step is the holes to put your satin ribbon through. Traditionally they poked holes and bound them with thread, but for the sake of practicality I used grommets. I used quite large ones just to try out the look of which the result I actually really like. Don’t worry about them being too present since your satin ribbon will cover up most of the shining grommet. I used 7 grommets on either side. I you want to go for smaller grommets, you should try out how many you need by laying them out on the pattern.
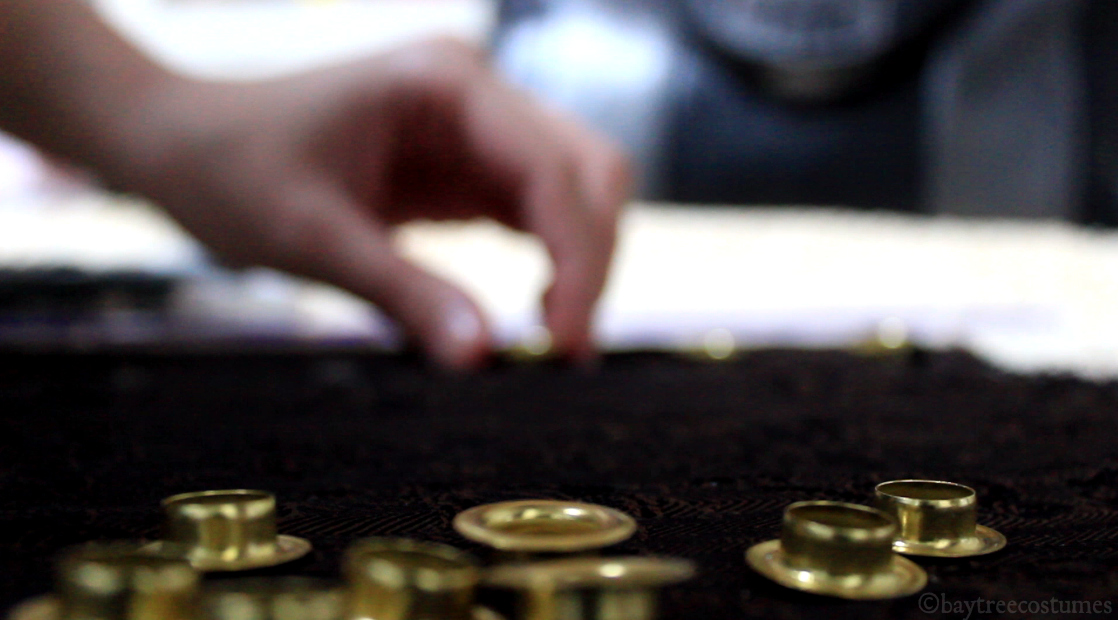
To calculate the distance between every grommet, divide the length from the middle of the first grommet to the last by the number of grommets minus 1. Your grommet kit should provide you with the grommet setting information. It was a bit of a pain to get them all in the right place, but don’t worry that one is a little off.
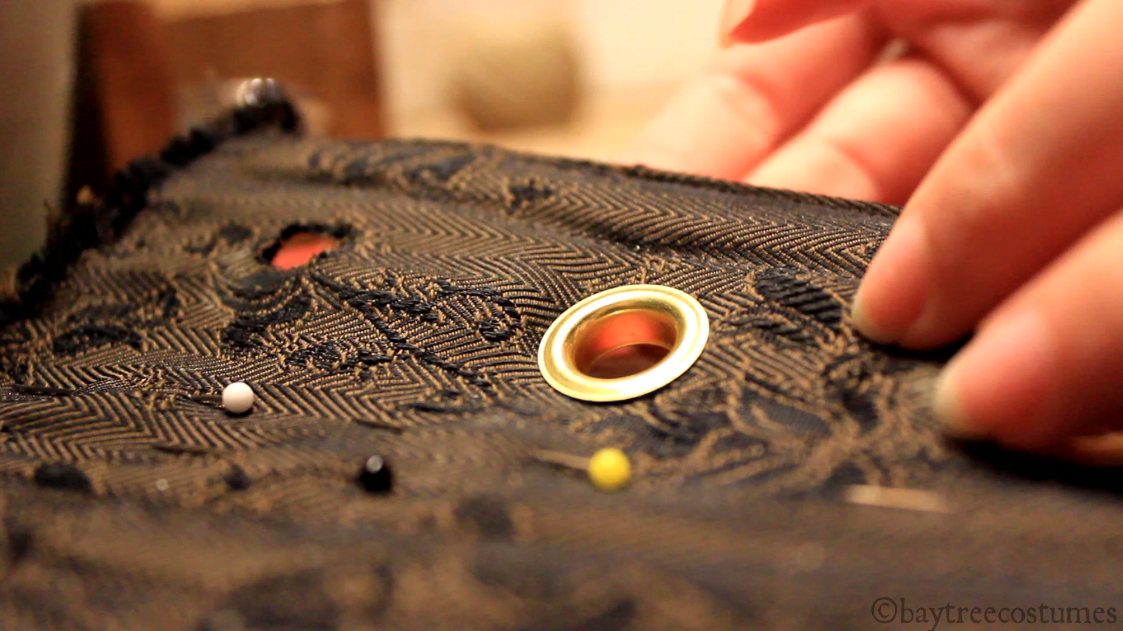
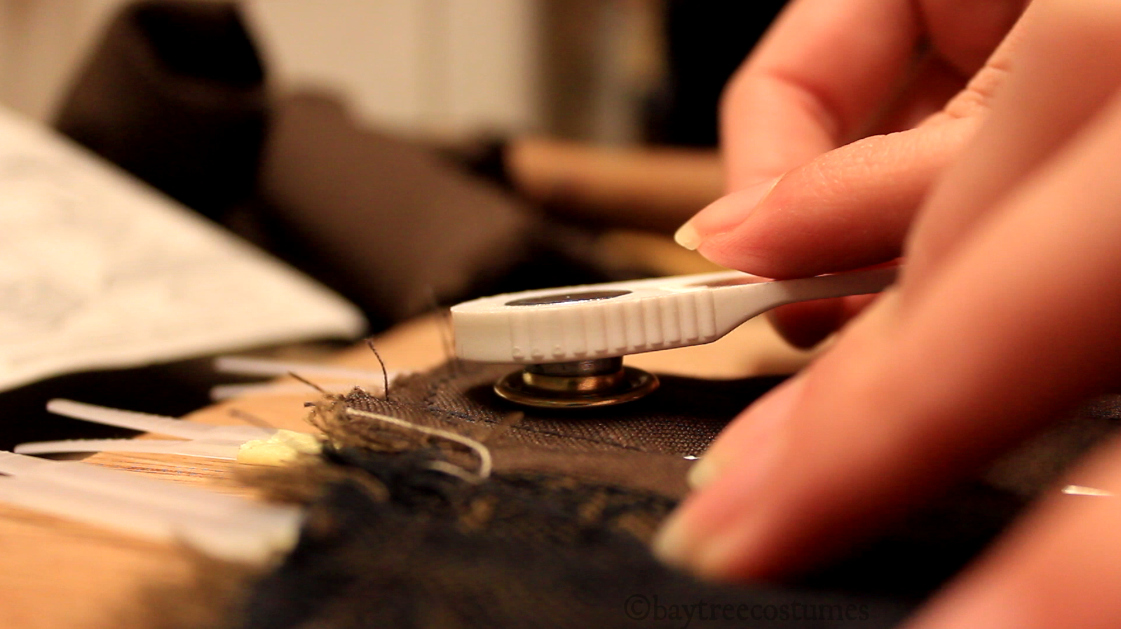
Tip! x3: wrap your hammer (if you use one when setting) in a piece of cloth. This will divide the pressure onto your grommet evenly. Also you could reinforce the holes by gluing the circumference before applying the grommets to prevent fraying as well. When you have set the grommets, try and push a fingernail between the grommet and the fabric. If you can get your nail in between, the grommet should be pressed tighter.
Once you have completed every step, behold your finished project!
Alternatives
If you want to seam close it completely, cut in step 1 with seam allowance and then follow every step until you reach step 4. You could close the top of the corset by flipping the top inwards and sew your seam. If you want it neatly and invisible, I don’t think that is really possible. Please comment if you think it is! Then you can bone the corset. Leave more room for the boning on the bottom. When you close the boning channels, flip the bottom inwards and sew.
If you want to make the corset sturdier, you could try to fully bone the corset.
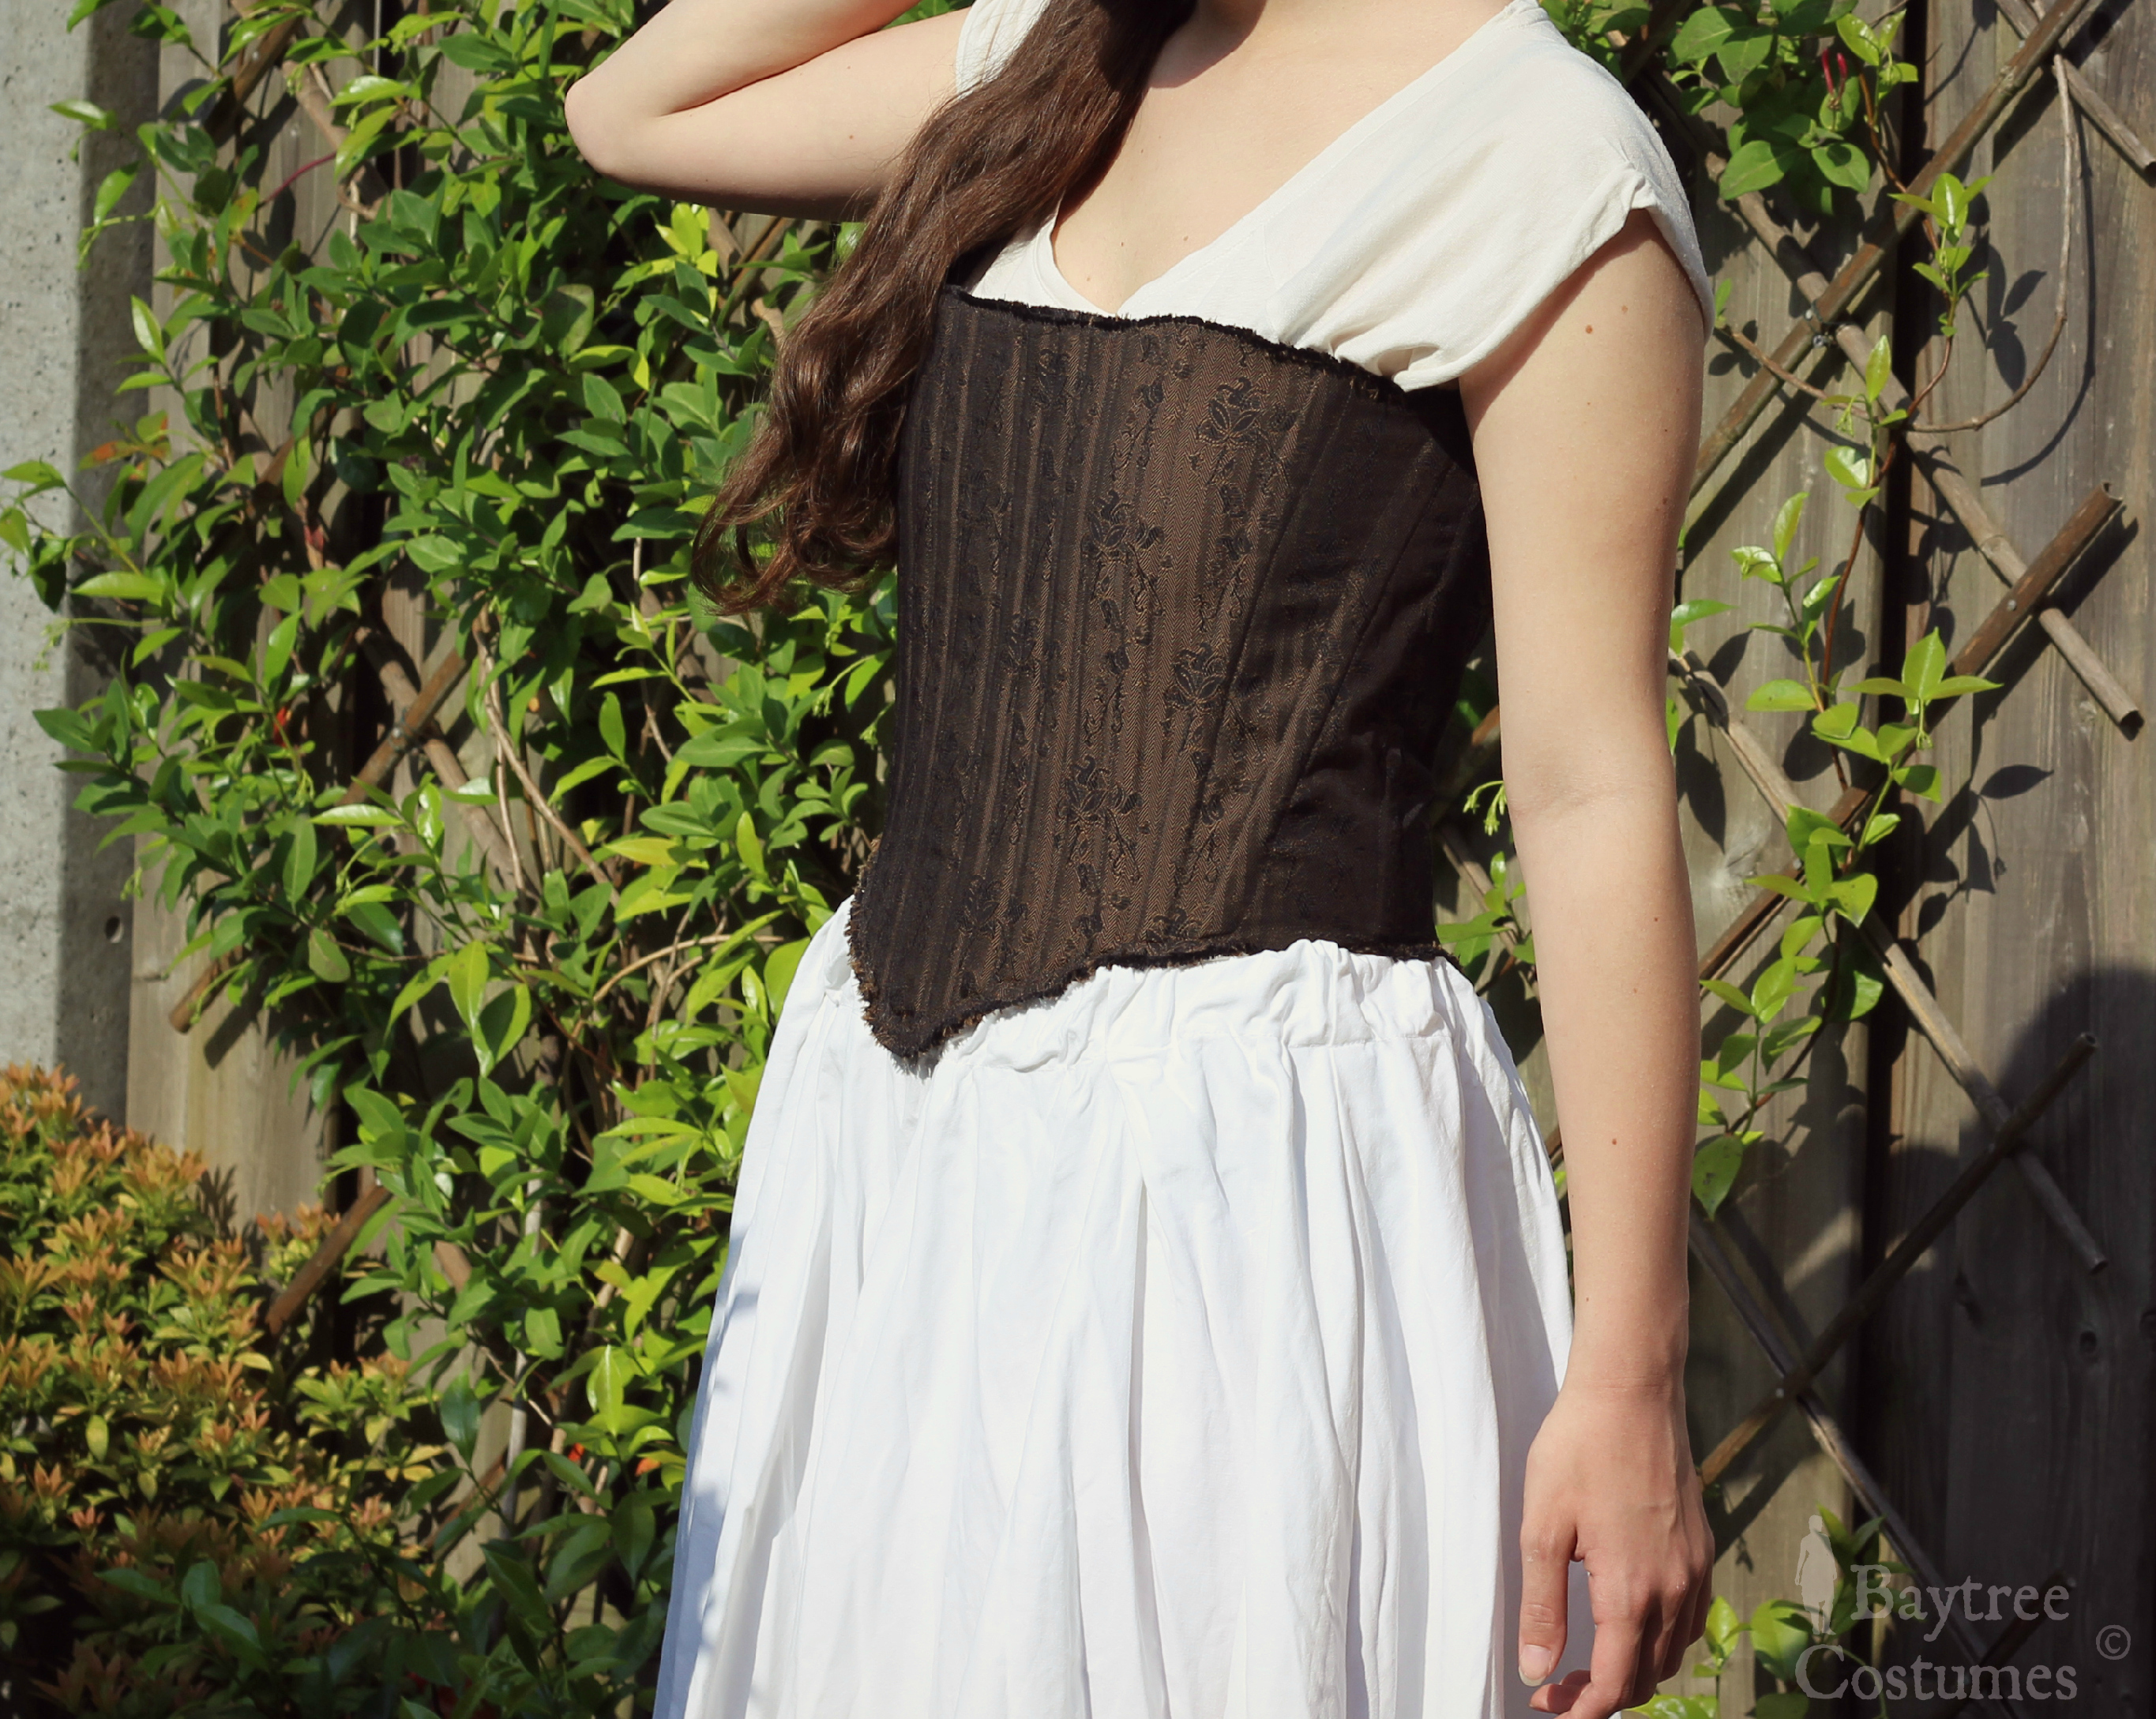
Some corset close-ups! I absolutely love the outcome.

Wearing my fake shift ;). Making a real shift will be my next project.
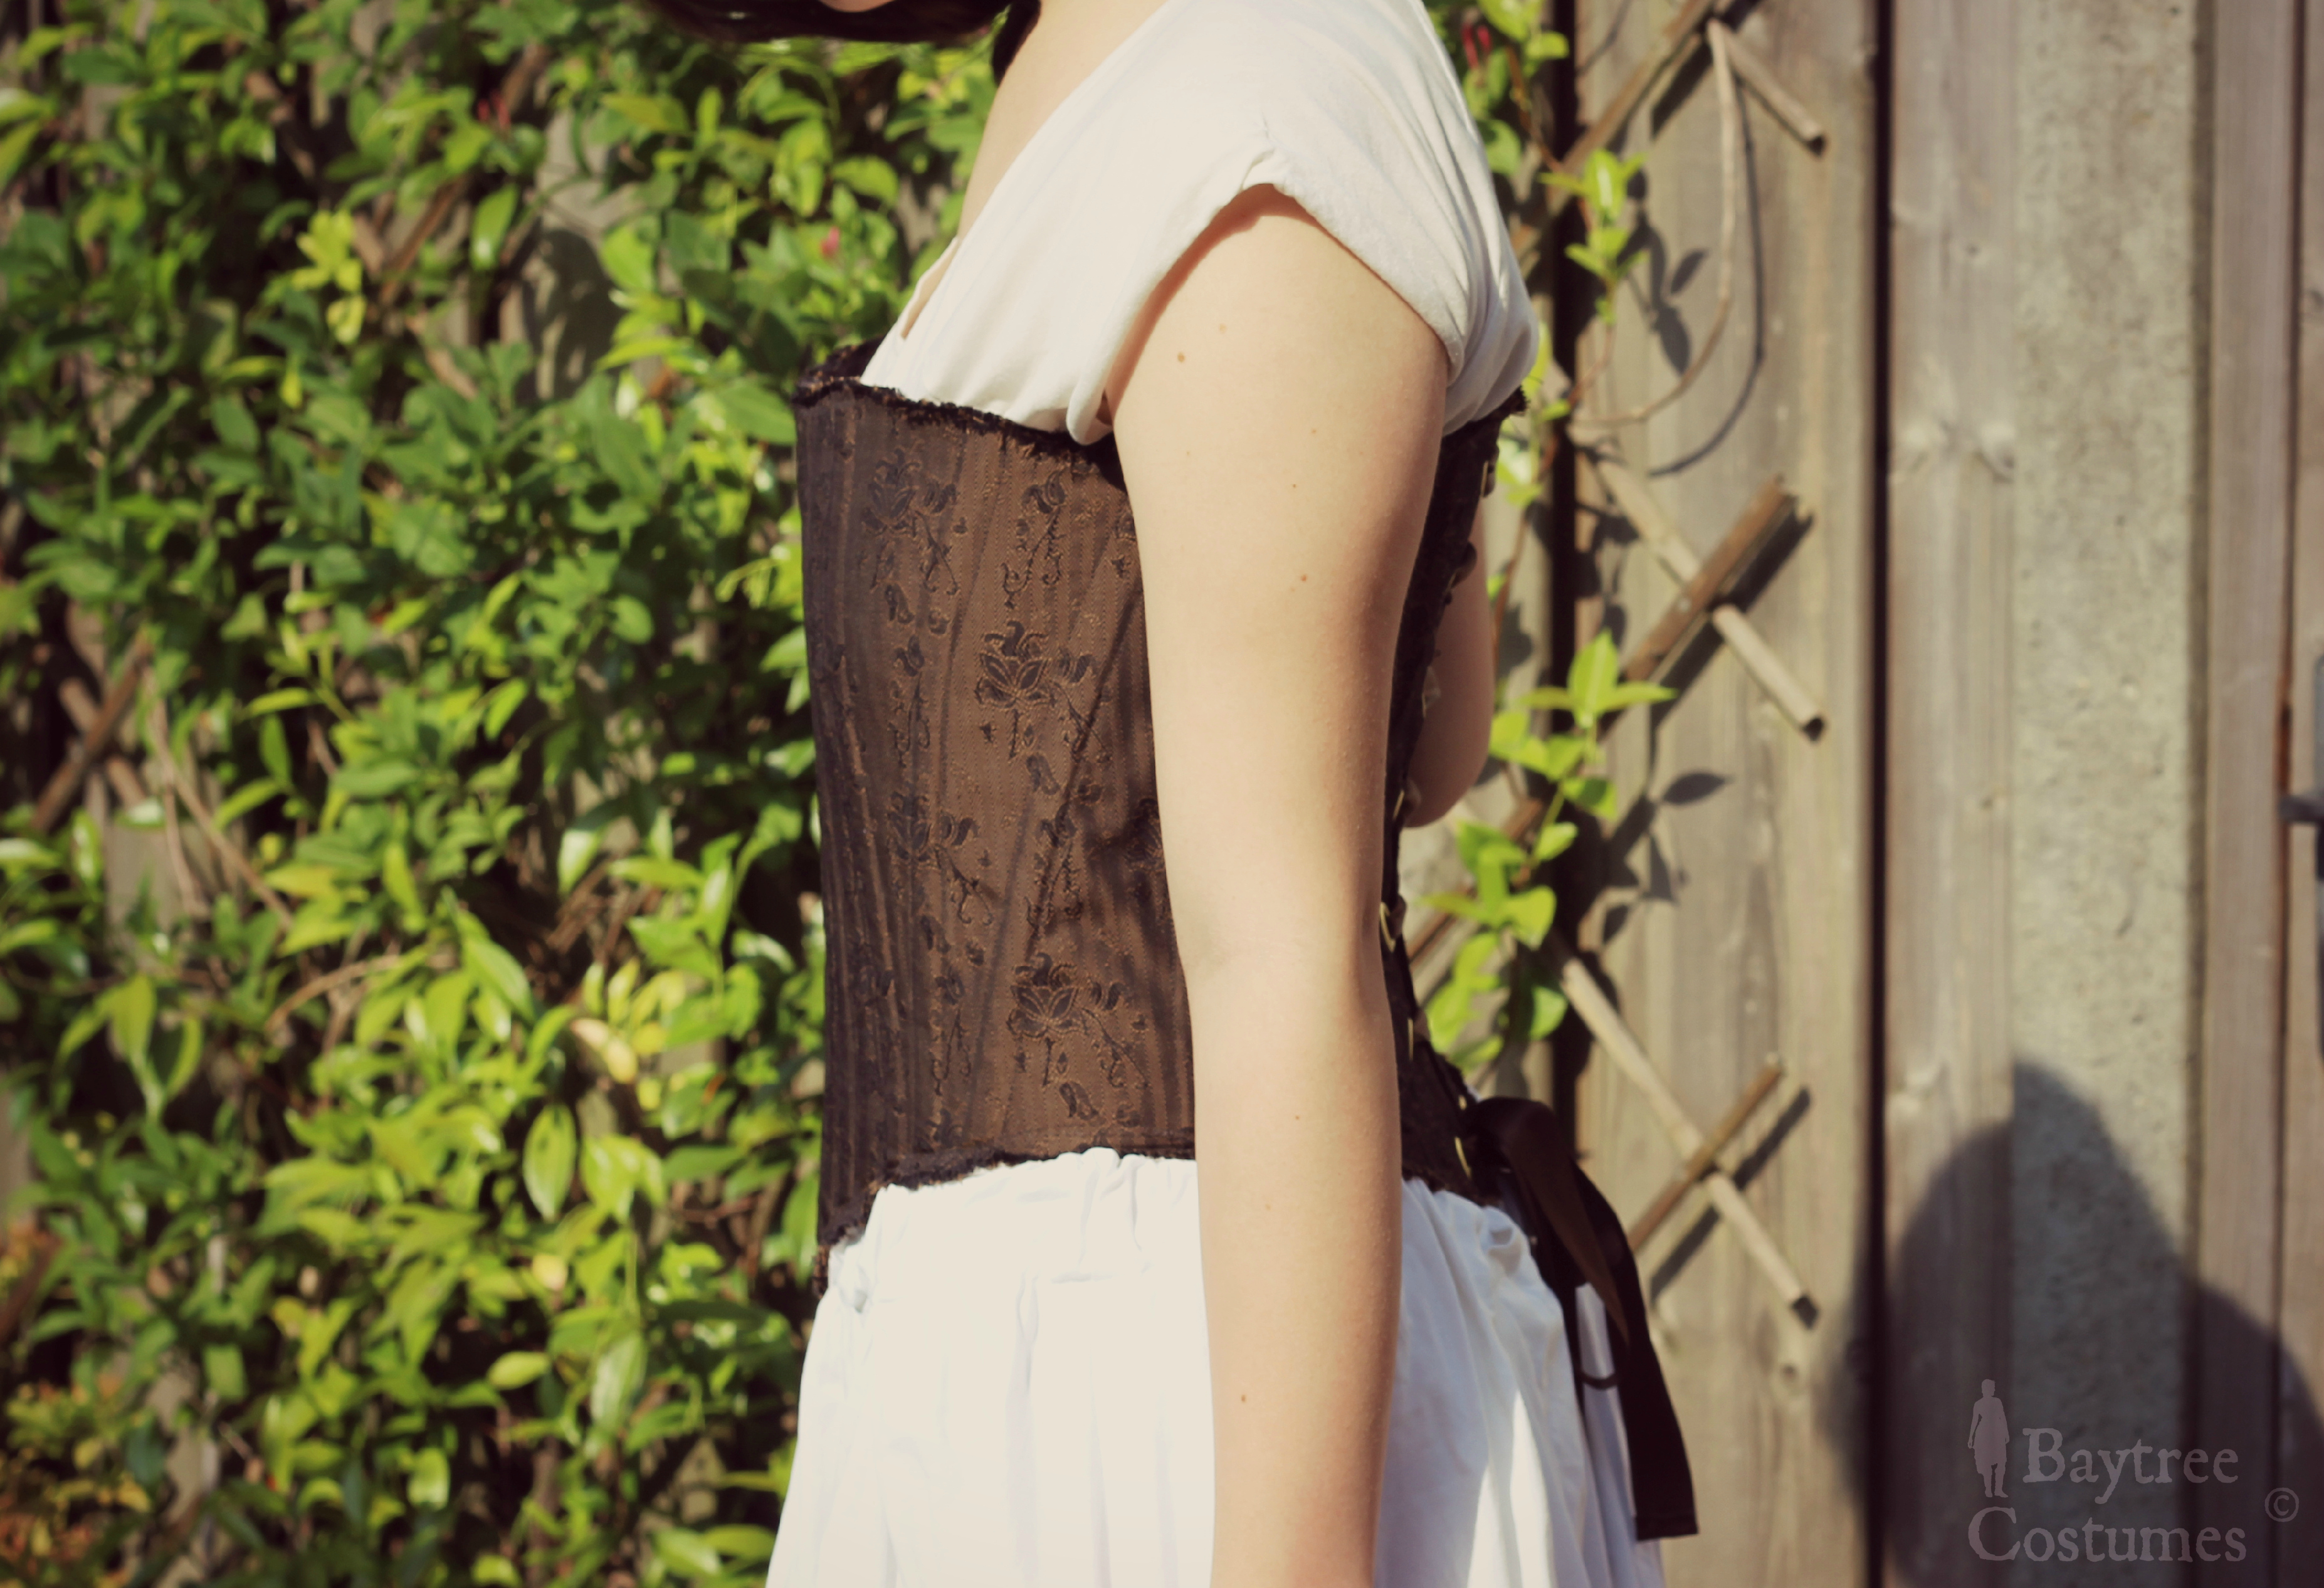
From the side it looks best..
 The back is a bit squishy here, but that doesn’t matter for now.
Please leave a like if you were inspired! Feel free to comment any tips since this is my first how-to article. Tell me if you made anything like this, I would love to know. ❤

Thank you for sharing I haven’t been brave enough to make a corset yet, but I plan on it…someday…hopefully soon!
LikeLike
I know exactly how that feels! But it was really not that hard as it seems. It just takes some time ;). Thank you so much for checking out my article and I’d love to know when you make a corset in the future.
LikeLiked by 1 person
For sure I’ll be posting all about it!
LikeLiked by 1 person